2023 সালে কীভাবে একটি গেমিং পিসি তৈরি করবেন – ডেক্সারটো, কীভাবে নতুনদের জন্য পিসি ইবুক তৈরি করবেন #আইইএসওয়াইবিল্ড | এমএসআই
নতুনদের জন্য একটি সম্পূর্ণ কীভাবে পিসি বিল্ডিং গাইড
প্রদত্ত সিপিইউর জন্য, প্রায়শই এটি সমর্থন করে এমন চিপসেটের একটি পছন্দ থাকে. . অনেকগুলি বিভিন্ন চিপসেট রয়েছে, সুতরাং সহজ করার জন্য, চিপসেট নম্বরটি যত বেশি হবে, আপনার মাদারবোর্ডের তত বেশি কার্যকারিতা থাকবে.
2023 সালে কীভাবে একটি গেমিং পিসি তৈরি করবেন
ডেক্সার্টো
? যদি তা হয় তবে আপনি সঠিক জায়গায় এসেছেন. এই গাইডটি আপনাকে পুরো প্রক্রিয়াটি পেরিয়ে যাবে, সঠিক উপাদানগুলি বেছে নেওয়া থেকে শুরু করে আপনার রগটি একত্রিত করা পর্যন্ত.
একটি শক্তিশালী গেমিং পিসি তৈরি করা প্রতিটি গেমারের স্বপ্ন. আমরা সকলেই এমন একটি গেমিং রগ চাই যা দক্ষতার সাথে সর্বাধিক উচ্চ-শেষ গেমগুলি চালাতে পারে এবং আপনাকে কোনও চাপ ছাড়াই ভিআর গেমস খেলতে দেয়.
এটি বলেছিল, আপনার কাছে বিভিন্ন প্রাক-বিল্ট গেমিং পিসি উপলব্ধ রয়েছে যা আপনি শেল্ফটি কিনতে পারেন, তারা একটি বিশাল দামের ট্যাগ নিয়ে আসে, প্রায়শই তাদের বেশিরভাগের জন্য নাগালের বাইরে তৈরি করে তোলে.
AD এর পরে নিবন্ধটি অব্যাহত রয়েছে
AD এর পরে নিবন্ধটি অব্যাহত রয়েছে
সুতরাং, যদি আপনার কাস্টম পিসি একত্রিত করার জন্য পর্যাপ্ত ধৈর্য থাকে তবে এটি নিজেই তৈরি করা নিখুঁত সমাধান. সতর্কতা অবলম্বন করা হলেও আপনার গেমিং পিসি তৈরি করা কয়েকটি উপাদান কেনা এবং একত্রিত করার চেয়ে বেশি. আপনাকে অবশ্যই নিবিড়ভাবে সর্বশেষ এবং সর্বশ্রেষ্ঠ সিপিইউ, এসএসডি, র্যাম, জিপিইউ, কীবোর্ড এবং আরও অনেক কিছু পরিকল্পনা করতে হবে এবং উত্স. এছাড়াও, আপনাকে নিশ্চিত করতে হবে যে সমস্ত আপনার নির্বাচিত উপাদানগুলি একে অপরের সাথে সামঞ্জস্যপূর্ণ.
আপনি যদি চিপসেট শিল্পের সাথে পরিচিত হন তবে 2023 এই প্রযুক্তি চ্যালেঞ্জটি গ্রহণ করার জন্য দুর্দান্ত সময়. ইন্টেলের শক্তিশালী 13 তম জেনারেল সিপিইউগুলি দুর্দান্ত পারফরম্যান্স এবং র্যামের দামগুলি সর্বকালের নীচে আঘাত করে, আপনি ভুল হতে পারবেন না.
AD এর পরে নিবন্ধটি অব্যাহত রয়েছে
AD এর পরে নিবন্ধটি অব্যাহত রয়েছে
ডাইভিং ইন করার আগে আপনাকে আপনার পদ্ধতির সাবধানতার সাথে পরিকল্পনা করতে হবে. আপনি কী ধরণের জন্তু তৈরি করতে চান? আপনি কি কোনও বাজেটের সাথে পারফরম্যান্সের ভারসাম্য বজায় রাখতে চান, বা আপনার চূড়ান্ত লক্ষ্যটিকে 4K গেমিং করতে আপত্তি করছেন? আপনি যা চান তার উপর নির্ভর করে আপনার আপনার কুলার, জিপিইউ এবং সেই অনুযায়ী অন্যান্য উপাদানগুলি আপগ্রেড করতে হবে.
একবার আপনি আপনার বাজেট এবং অগ্রাধিকারগুলি বাছাই করে নিলে আপনি আপনার স্বপ্নের গেমিং পিসি তৈরি করতে পারেন.
পদক্ষেপ 1: একটি কেস চয়ন করুন
অন্য কিছু বাছাইয়ের আগে, আপনার সিস্টেমের জন্য একটি কেস চয়ন করুন. এটি আপনার পিসির আকার নির্ধারণ করবে এবং আপনার সিস্টেমের মধ্যে মাদারবোর্ডের আকার, শীতল সামঞ্জস্যতা এবং বায়ু প্রবাহ নির্ধারণ করবে. সর্বাধিক জনপ্রিয় ফর্ম ফ্যাক্টরটি হ’ল মিড-টাওয়ার কেস যেমন লিয়ান লি ল্যাঙ্কুল দ্বিতীয় জাল. কিছু ক্ষেত্রে প্রিমিয়াম বৈশিষ্ট্য রয়েছে যা আপনি চাইতে পারেন, যেমন কুলার মাস্টার এর হাফ 700 ইভিও, তবে এগুলির জন্য বোমা লাগতে পারে.
AD এর পরে নিবন্ধটি অব্যাহত রয়েছে
সম্পর্কিত:
শীর্ষ 10 সবচেয়ে ব্যয়বহুল এনএফটি কখনও বিক্রি হয়
আপনি যদি একটি কমপ্যাক্ট তৈরি করতে চান তবে ছোট গেমিং পিসি. আপনার মাদারবোর্ডের জন্য আপনার আরও কিছুটা অর্থ প্রদানের আশা করা উচিত এবং আপনাকে আপনার উপাদান পছন্দ সহ সৃজনশীল হতে হতে পারে. . সুতরাং, বুদ্ধিমানের সাথে বাছাই করতে ভুলবেন না.
একবার আপনি নিজের কেসটি বেছে নিলে, আপনি তারপরে উপাদানগুলি বেছে নেওয়ার দিকে এগিয়ে যেতে পারেন.
পদক্ষেপ 2: আপনার উপাদানগুলি চয়ন করুন
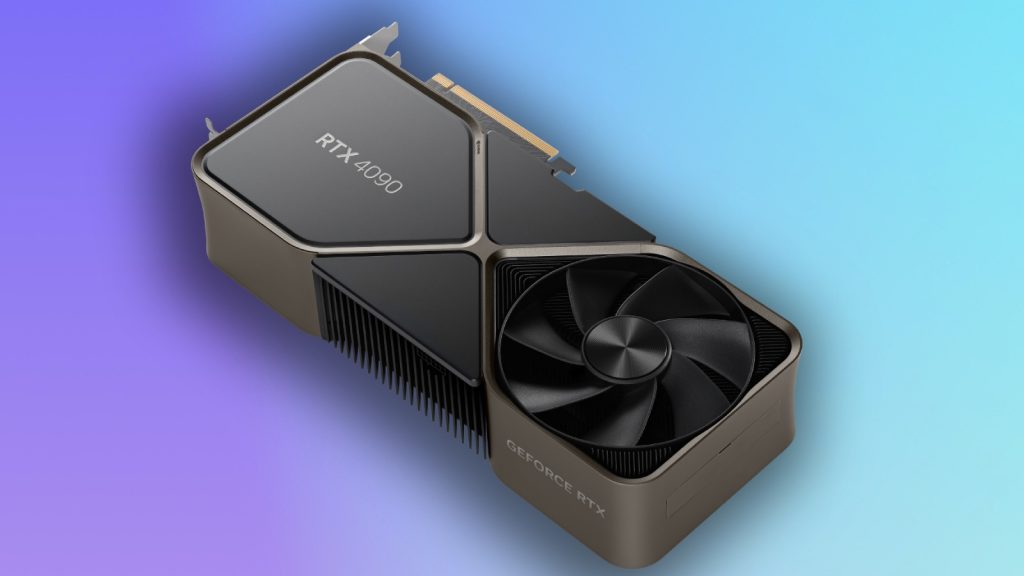
উপাদান বাছাই করা সত্যিই ঝামেলা হতে পারে. আপনি যদি কোনও ইন্টেল বা এএমডি সিপিইউ বাছাই করছেন তবে নিশ্চিত হয়ে নিন যে আপনি এটির পাশাপাশি যেতে সঠিক মাদারবোর্ডটি বেছে নিচ্ছেন. মনে রাখবেন, আপনার পিসির জন্য একটি আরটিএক্স 4090 চয়ন করা যদি আপনার সিপিইউ এবং বিদ্যুৎ সরবরাহ এটি চালানোর কাজ না করে তবে খুব সামান্য অর্থ হবে.
AD এর পরে নিবন্ধটি অব্যাহত রয়েছে
নিম্নলিখিত উপাদানগুলির একটি চেকলিস্ট তৈরি করুন:
পারফরম্যান্স নির্ধারণ করবে এমন প্রধান ক্ষেত্রগুলি আপনার সিপিইউ এবং জিপিইউ হবে. আপনার মাদারবোর্ডটি মারধরকারী হৃদয় হিসাবে বসার সময়, সবকিছু সঠিকভাবে কাজ করছে তা নিশ্চিত করে. কিছু মাদারবোর্ড আরও মেমরি স্লট বা অভিনব ইউএসবি-সি শিরোনামগুলির মতো প্রিমিয়াম বৈশিষ্ট্যগুলি সরবরাহ করতে পারে, তাই বুদ্ধিমানের সাথে চয়ন করতে ভুলবেন না.
আপনার এমন একটি পিএসইউ (বিদ্যুৎ সরবরাহ) বাছাই করা উচিত যা আপনি এটি ছুঁড়ে ফেলেছেন এমন সমস্ত কিছু চালাতে সক্ষম. নিশ্চিত হয়ে নিন যে আপনি একটি নামী ব্র্যান্ডের পিএসইউ তুলেছেন, কারণ এই উপাদানটিতে ঝাঁকুনি দেওয়া আপনাকে সত্যিই বাসের নীচে ফেলে দিতে পারে এবং অন্য অংশগুলি ব্যর্থ হতে পারে যদি এটি কার্যটির উপর নির্ভর না হয়.
AD এর পরে নিবন্ধটি অব্যাহত রয়েছে
AD এর পরে নিবন্ধটি অব্যাহত রয়েছে
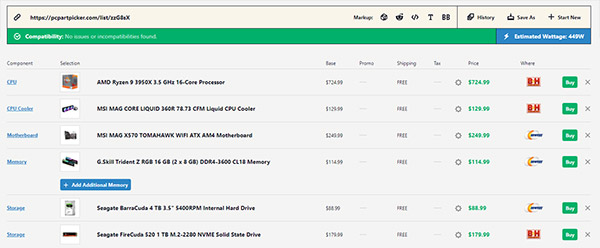
প্রস্তাবিত বিল্ড: একটি মান $ 1000 গেমিং পিসি
আমরা নিজেরাই কয়েকটি অংশ বেছে নিয়েছি, যা আপনাকে আপনার গেমিং পিসিটি প্রায় 1000 ডলারে তৈরি করতে সহায়তা করবে. এটিতে ইন্টেলের 13 তম-জেন সিপিইউ এবং একটি এএমডি আরএক্স 6700 অন্তর্ভুক্ত রয়েছে যা একটি দুর্দান্ত শক্তিশালী সিস্টেমের জন্য তৈরি করবে.
- সিপিইউ: ইন্টেল কোর আই 5-13600 কে
- জিপিইউ: এএমডি র্যাডিয়ন আরএক্স 6700 এক্সটি
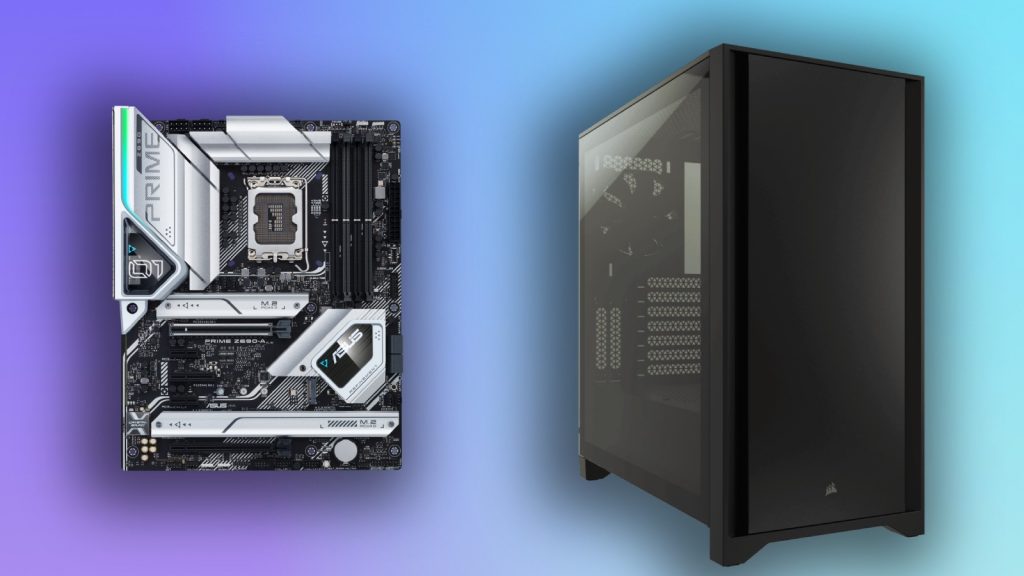
- মাদারবোর্ড: গিগাবাইট বি 660 এম ডিএস 3 এইচ*
- র্যাম: কর্সায়ার এলপিএক্স 16 জিবি ডিডিআর 4-3200
- স্টোরেজ: সাবরেন্ট রকেট 4.0 1 টিবি এনভিএমই এসএসডি
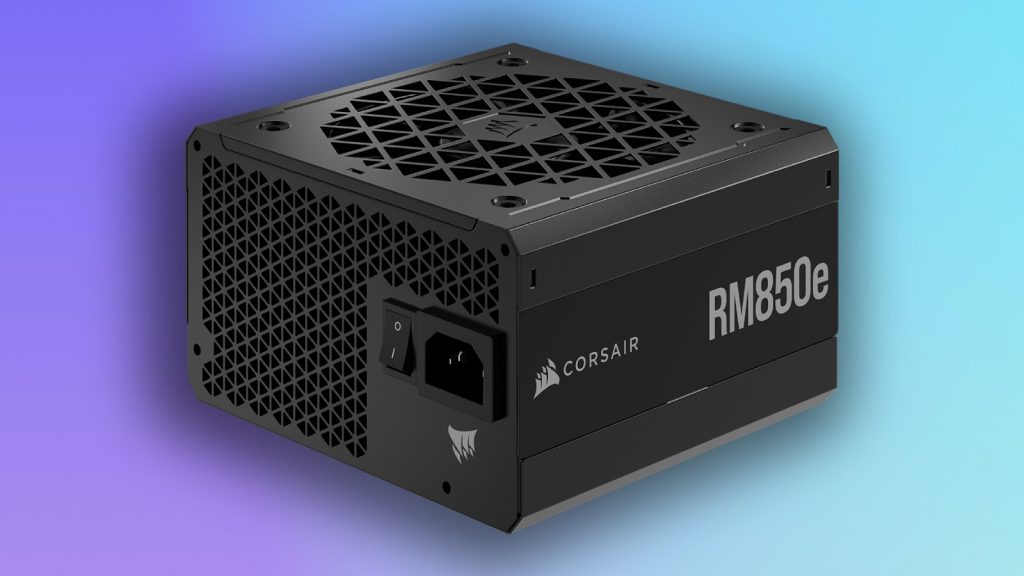
- পিএসইউ: থার্মালটেক শক্ত শক্তি জিএফ 1 650W গোল্ড পিএসইউ
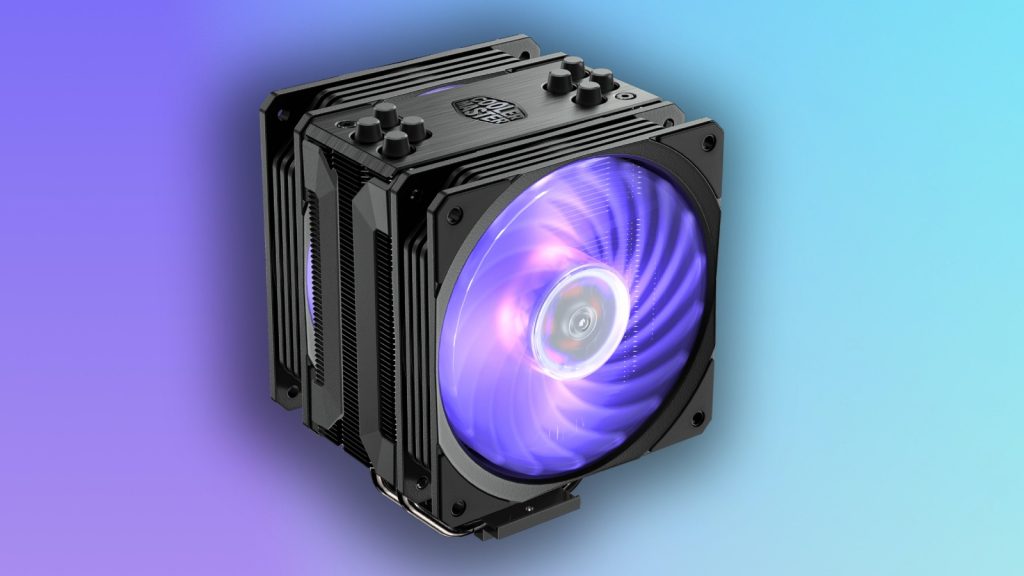
- সিপিইউ কুলার: ডিপকুল একে 400
- কেস:কর্সার 4000 ডি এয়ারফ্লো
* বি 660 বোর্ডগুলির জন্য আপনাকে ইন্টেল 13 তম জেনারেল সিপিইউগুলির কাজ করার জন্য বায়োস ফ্ল্যাশ করার প্রয়োজন হতে পারে. কিছু খুচরা বিক্রেতারা ক্রয়ের পয়েন্টে এই পরিষেবাটি সরবরাহ করে. আপনি এই মাদারবোর্ডের সাথেও একটি ছোট মাইক্রোটেক্স কেসও নির্বাচন করতে পারেন.
AD এর পরে নিবন্ধটি অব্যাহত রয়েছে
পদক্ষেপ 3: আপনার বিল্ড প্রস্তুত করুন
আপনি যদি নিশ্চিত করতে চান যে আপনার বিল্ডটি সুচারুভাবে চলেছে, আমরা আপনাকে আপনার অংশগুলি এবং সরঞ্জামগুলির জন্য একটি ছোট অঞ্চল প্রস্তুত করার পরামর্শ দিই. আপনার হাতে একটি ভাল স্ক্রু ড্রাইভার রয়েছে তা নিশ্চিত করুন, কারণ বিল্ড প্রক্রিয়া চলাকালীন আপনাকে এটি ব্যবহার করতে হবে.
AD এর পরে নিবন্ধটি অব্যাহত রয়েছে
আপনি একটি ইউএসবি স্টিকের উপর একটি বুটেবল ওএস চিত্র তৈরি করতে চাইবেন. আপনি এখানে উইন্ডোজের জন্য একটি ধরতে পারেন. উইন্ডোজ 11 ইনস্টলেশন মিডিয়া নির্বাচন করতে ভুলবেন না.
AD এর পরে নিবন্ধটি অব্যাহত রয়েছে
তারপরে, নিশ্চিত করুন যে আপনার সমস্ত অংশ নিরাপদে পৌঁছেছে. একবার এটি সমস্ত উপস্থিত হয়ে গেলে, এবং আপনার একটি ছোট বিল্ড অঞ্চল প্রিপড হয়ে যায়, আপনি আপনার গেমিং পিসি বিল্ডটি আন্তরিকভাবে শুরু করতে পারেন.
পদক্ষেপ 4: সিপিইউ ইনস্টল করা
প্রথমত, আপনার মাদারবোর্ডটি তার বাক্স থেকে বের করে নিন এবং এটি দিয়ে আসা স্থির শীটের উপরে রাখুন. তারপরে, বাক্সের উপরে মাদারবোর্ড এবং স্ট্যাটিক ব্যাগটি পপ করুন. এখন, আমরা মাদারবোর্ডকে প্রিপিং শুরু করতে চাই.
AD এর পরে নিবন্ধটি অব্যাহত রয়েছে
. আধুনিক মাদারবোর্ডগুলি একটি এলজিএ সিস্টেম ব্যবহার করে, যা একটি ছোট লিভার যা ল্যাচটি প্রকাশ করে যাতে সিপিইউ স্থাপন করা যায়. . একবার এটি আনল ম্যাচ হয়ে গেলে, আপনার সিপিইউ বাক্স থেকে বের করে নিন.
AD এর পরে নিবন্ধটি অব্যাহত রয়েছে
আপনি এখানে যা খুঁজছেন তা নীচে সোনার পরিচিতি সহ একটি ছোট চিপ. সিপিইউকে এর প্রান্তগুলি ধরে রাখুন, যাতে সোনার পরিচিতিগুলিকে বিরক্ত না করা যায়. সিপিইউ খুব ভঙ্গুর. তারপরে, আপনার সিপিইউতে একটি তীর দেখতে হবে, এটি মাদারবোর্ডে সকেটের সাথে লাইন করুন এবং আলতো করে সকেটে রাখুন.
AD এর পরে নিবন্ধটি অব্যাহত রয়েছে
এটি একবার হয়ে গেলে, আপনি আবারও ধরে রাখার স্তরটি কমিয়ে আনতে পারেন, এর জন্য কিছুটা শক্তি প্রয়োজন হতে পারে তবে যতক্ষণ না এটি সমস্ত সঠিকভাবে রেখাযুক্ত থাকে ততক্ষণ আপনি কোনও ভুল করছেন না.
AD এর পরে নিবন্ধটি অব্যাহত রয়েছে
পদক্ষেপ 5: আপনার র্যাম ইনস্টল করা
আপনার র্যামে স্লট করার জন্য, আপনাকে প্রথমে আপনার মাদারবোর্ডে র্যাম স্লটটি সনাক্ত করতে হবে, এটি একটি দীর্ঘ স্ট্রিপ, উভয় প্রান্তে ল্যাচগুলি সহ. আপনার মাদারবোর্ড ম্যানুয়াল ব্যবহার করে, প্রাথমিক স্লটগুলি সনাক্ত করুন. যদি আপনি একাধিক র্যামের র্যাম ইনস্টল করে থাকেন তবে নিশ্চিত হয়ে নিন যে আপনি এটি কিছুটা দ্রুততর দ্বৈত-চ্যানেল মোডে চালানোর জন্য সঠিক স্লটগুলি বেছে নিয়েছেন. এটি সাধারণত একটি “এ 2 এবং বি 2” উপাধি দ্বারা অনুমান করা হয়. তারপরে, নিশ্চিত হয়ে নিন যে স্লটগুলি আনল ম্যাচ করা হয়েছে.
AD এর পরে নিবন্ধটি অব্যাহত রয়েছে
এখন, আপনার র্যামটি আনবক্স করুন এবং আপনার র্যাম স্টিক এবং মাদারবোর্ডে ছোট খাঁজটি কোথায় রয়েছে তা সনাক্ত করুন. তারপরে, আপনি একটি ছোট ক্লিক না শুনে কিছু চাপ প্রয়োগ করার মতো সহজ. এটি বোঝায় যে র্যামটি সঠিকভাবে স্থাপন করা হয়েছে. ডাবল-চেক করতে ভুলবেন না যে উভয় প্রান্তই আপনি ইনস্টল করছেন এমন প্রতিটি র্যামের উপর সঠিকভাবে বসে আছেন. একবার এগুলি সমস্ত স্লটেড হয়ে গেলে আপনি পরবর্তী পদক্ষেপে যেতে পারেন.
AD এর পরে নিবন্ধটি অব্যাহত রয়েছে
পদক্ষেপ 6: একটি মি ইনস্টল করা.2 এনভিএম এসএসডি
বেশিরভাগ আধুনিক সিস্টেম এখন একটি মি ব্যবহার করে.. এটি ইনস্টল করার জন্য আপনার মাদারবোর্ডে একটি বন্দর থাকা উচিত. একবার আপনি এটি সনাক্ত করার পরে, নিশ্চিত হয়ে নিন যে আপনার মাদারবোর্ডের জন্য বাক্সে অন্তর্ভুক্ত থাকতে পারে এমন ছোট ছোট স্ক্রুগুলির মধ্যে একটি রয়েছে. তারপরে এম স্লট.আপনার সিস্টেমে 2 এনভিএমই এসএসডি. . তারপরে, এটি আপনার মাদারবোর্ডে স্ক্রু-গর্তের সাথে সারিবদ্ধ না হওয়া পর্যন্ত আলতো করে টিপুন এবং নিরাপদে এটিকে জায়গায় স্ক্রু করুন.
কম বিজ্ঞাপন | অন্ধকার মোড | গেমিং, টিভি এবং সিনেমা এবং প্রযুক্তিতে ডিল করে
AD এর পরে নিবন্ধটি অব্যাহত রয়েছে
পদক্ষেপ 7: আপনার সিপিইউ কুলার (এয়ার) ইনস্টল করুন
এখন, আপনি যদি আপনার সিস্টেমের জন্য একটি এয়ার কুলার বাছাই করে থাকেন তবে এটি ইনস্টল করার জন্য এটি সেরা জায়গা. আপনি যদি একটি আফটার মার্কেট কুলার ব্যবহার করছেন. এটি আপনার সিস্টেমে এটি ইনস্টল করার জন্য প্রদত্ত নির্দেশাবলী অনুসরণ করেছেন তা নিশ্চিত করুন. আপনি যদি এআইও ওয়াটার কুলার ব্যবহার করছেন তবে এই পদক্ষেপটি করার জন্য আপনার কিছুটা পরে অপেক্ষা করা উচিত. . এটি করার সময় আপনার ভক্তদের হুক আপ করতে ভুলবেন না.
AD এর পরে নিবন্ধটি অব্যাহত রয়েছে
.
পদক্ষেপ 8: আপনার মাদারবোর্ডকে কেসটিতে রাখুন
এখন যেহেতু আপনার মাদারবোর্ডটি সমস্ত প্রস্তুত রয়েছে, আপনি আপনার কেসটি আনবক্স করতে এবং এটি সমতল করতে চান. যদি আপনার মাদারবোর্ডের একটি বিচ্ছিন্ন আইও ield াল থাকে তবে আপনি এখনই এটি রাখতে চাইবেন. যদি তা না হয় তবে আপনি আপাতত নিরাপদে এটিকে উপেক্ষা করতে পারেন.
অনেক কেস প্রিন্সস্টল স্ট্যান্ডঅফ সহ আসে. . . একবার পুরোপুরি সারিবদ্ধ হয়ে গেলে, স্ট্যান্ডঅফগুলিতে মাদারবোর্ডটি স্ক্রু করতে শুরু করুন. এটি আপনার মাদারবোর্ডের গর্তগুলির সাথেও সারিবদ্ধ হওয়া উচিত. . যতক্ষণ না আপনি আপনার ক্ষেত্রে মাদারবোর্ডকে নিরাপদে দৃ ten ়ভাবে বেঁধে রাখেন ততক্ষণ এটি চালিয়ে যান.
তারপরে, আপনি আপনার সামনের আইও কেবলগুলি হুক আপ করতে চাইবেন, এটি ছোট ফ্রন্ট-প্যানেল পিন ছাড়াও একটি ইউএসবি শিরোনাম বা দুটি প্রয়োজন হতে পারে. এটি কোথায় এবং পিনগুলি কোথায় হওয়া দরকার তা বুঝতে আপনার মাদারবোর্ডের ম্যানুয়ালটির সাথে পরামর্শ করুন.
AD এর পরে নিবন্ধটি অব্যাহত রয়েছে
. আপনার যদি একটি মডুলার পাওয়ার সাপ্লাই থাকে তবে আপনি নিশ্চিত করতে চান যে আপনার কাছে মাদারবোর্ড, সিপিইউ এবং জিপিইউ কেবলগুলি সংযুক্ত রয়েছে. তারপরে, আপনার সিস্টেমে পাওয়ার সাপ্লাই রাখুন. এখন, সাবধানতার সাথে কেবলগুলি তাদের উদ্দেশ্যে অবস্থানগুলিতে রুট করুন. আপনার 24-পিন মাদারবোর্ড কেবলটি মাদারবোর্ডের ডানদিকে, উপরের বাম দিকে সিপিইউ সংযোগকারীগুলি এবং জিপিইউ কেবলটি আন্ডারসাইডে চালিত করা উচিত.
তারপরে, আপনার মাদারবোর্ড এবং সিপিইউর জন্য পিএসইউ কেবলগুলি আপনার সিস্টেমে সংযুক্ত করুন.
পদক্ষেপ 10: আপনার সিপিইউ কুলার ইনস্টল করুন (এআইও)
আপনার সিপিইউর জন্য যদি আপনার কাছে একটি অল-ইন ওয়াটার কুলার থাকে তবে এই সময়টি আপনার এটি ইনস্টল করা উচিত. প্রথমত, আমরা আপনার ক্ষেত্রে ভক্ত এবং রেডিয়েটার ইনস্টল করার পরামর্শ দেব. . তারপরে ভক্তরা কীভাবে আপনার ক্ষেত্রে এআইওর সাথে সারিবদ্ধ হয় তা বোঝার জন্য সাবধানতার সাথে আপনার এআইওর ম্যানুয়ালটি অনুসরণ করুন.
AD এর পরে নিবন্ধটি অব্যাহত রয়েছে
তারপরে, আপনি আপনার মাদারবোর্ডে কোনও বন্ধনী রাখতে চাইবেন. . আমরা ভাতের শস্যের আকারের একটি ব্লবকে সুপারিশ করি. .
AD এর পরে নিবন্ধটি অব্যাহত রয়েছে
প্রয়োজনীয় সমস্ত কেবলগুলি আপনার মাদারবোর্ডে প্লাগ ইন করা হয়েছে তা নিশ্চিত করতে আপনি এখানে কিছুটা সময় নিতে চাইবেন, এতে ফ্যান শিরোনাম, ইউএসবি শিরোনাম বা সাতা পাওয়ার অন্তর্ভুক্ত থাকতে পারে. আপনার যদি সোয়া শক্তি প্রয়োজন হয় তবে কেবল আপনার পিএসইউতে একটি সোয়াট কেবল সংযুক্ত করুন এবং এটি সমস্ত হুক করুন. আপনি যদি কোনও মাদারবোর্ড শিরোনাম কোথায় রাখবেন বা সনাক্ত করবেন সে সম্পর্কে আপনি যদি অনিশ্চিত থাকেন তবে ম্যানুয়ালটির সাথে পরামর্শ করুন.
AD এর পরে নিবন্ধটি অব্যাহত রয়েছে
পদক্ষেপ 11: আপনার জিপিইউ ইনস্টল করুন
আপনার জিপিইউ ইনস্টল করতে, আপনার ক্ষেত্রে কোনও বাধা নেই তা নিশ্চিত করুন. এর মধ্যে পিছনে কিছু বন্ধনী অন্তর্ভুক্ত থাকতে পারে যা অপসারণ করা দরকার. আপনার গ্রাফিক্স কার্ডের আকারের উপর নির্ভর করে এটি দুই থেকে চারটি স্লটের মধ্যে যে কোনও জায়গায় হতে পারে.
AD এর পরে নিবন্ধটি অব্যাহত রয়েছে
তারপরে, আপনার জিপিইউতে পিসিআই সংযোগকারীটিকে আপনার মাদারবোর্ডে খাঁজ দিয়ে সারিবদ্ধ করুন. আপনি একটি সন্তোষজনক ক্লিক না শুনে এটিকে ধাক্কা দিন. যদি এটি কাজ না করে থাকে তবে নিশ্চিত হয়ে নিন যে আপনি সকেটে স্তরযুক্ত.
একবার জিপিইউ জায়গায় ক্লিক হয়ে গেলে, আপনি স্লটগুলির জন্য বন্ধনীটিতে স্ক্রু করতে চান. .
AD এর পরে নিবন্ধটি অব্যাহত রয়েছে
একবার এটি সমস্ত জায়গায় ছড়িয়ে পড়লে, আমরা আগে যে পিএসইউ তারগুলি তৈরি করেছিলাম সেগুলি হুক আপ করুন এবং সেগুলি আপনার জিপিইউতে প্লাগ করুন. আপনার যদি এমন কোনও জিপিইউ থাকে যা এনভিডিয়ার নতুন 12 ভিএইচপিডাব্লুআর সংযোগকারী ব্যবহার করে তবে আপনি প্রায় 3 টি রেখে গেছেন তা নিশ্চিত করুন.এটি বাঁকানোর আগে 5 মিমি স্থান.
AD এর পরে নিবন্ধটি অব্যাহত রয়েছে
পদক্ষেপ 12: কোনও অতিরিক্ত ভক্ত বা আনুষাঙ্গিক ইনস্টল করুন
আপনি যদি অতিরিক্ত অনুরাগী ইনস্টল করতে চান তবে এটি আপনার সুযোগ, আপনার পিসিতে হেডারটি সন্ধান করুন যাতে তাদের সমস্ত কিছু আপ করার জন্য. আপনার যদি আরগবি শিরোনাম থাকে তবে নিশ্চিত হয়ে নিন যে আপনি সঠিক শিরোনামটি ব্যবহার করেছেন, কারণ এটিকে ভুলটিতে প্লাগ করা আপনার আরজিবি সদ্ব্যবহারকে সংক্ষিপ্ত করে তুলতে পারে.
পাওয়ার কেবলটি হুক আপ করুন এবং আপনার পিএসইউ স্যুইচ করুন, পরবর্তী, আপনার জিপিইউ ডিসপ্লে পোর্টগুলি আপনার মনিটরে আপ করুন. তারপরে, পাওয়ার বোতাম টিপুন. আপনি যদি এটি সঠিকভাবে সম্পন্ন করে থাকেন তবে আপনার পিসিটিতে প্রাণবন্ত হওয়া উচিত এবং আপনাকে একটি বায়োস স্ক্রিন দিয়ে স্বাগত জানানো হবে. আপনি যদি এই মুহুর্তে পৌঁছেছেন তবে আপনি এখন কোনও কীবোর্ড হুক আপে উইন্ডোজের মতো একটি ওএস ইনস্টল করতে পারেন.
AD এর পরে নিবন্ধটি অব্যাহত রয়েছে
AD এর পরে নিবন্ধটি অব্যাহত রয়েছে
যদি এটি চালু না করা হয় তবে পাওয়ার বোতামের জন্য মাদারবোর্ড পিনআউটগুলিতে আপনার পদক্ষেপগুলি প্রত্যাহার করুন. যদি এটি চলে তবে আপনি পোস্ট করছেন না, আপনার একটি হার্ডওয়্যার ইস্যু সন্ধান করতে হবে. কিছু মাদারবোর্ডগুলিতে ঝলকানো এলইডি বা কোড রয়েছে যা কী ভুল হচ্ছে তা নির্দেশ করে. ব্যর্থ যে. আপনার সমস্ত পদক্ষেপগুলি প্রত্যাহার করুন এবং পুনরায় করুন. যদি এটি এখনও কাজ না করে, তবে আপনি কোনও বিদ্যুতের সমস্যার মুখোমুখি হতে পারেন.
পদক্ষেপ 14: উইন্ডোজ এবং ড্রাইভার ইনস্টল করুন
এরপরে, আপনার বুটেবল উইন্ডোজ ড্রাইভ ব্যবহার করে ওএস ইনস্টল করুন. এটি বেশ স্ব-ব্যাখ্যামূলক. তারপরে, একবার আপনি উইন্ডোজে থাকলে, নিশ্চিত করুন যে আপনি আপনার জিপিইউ ড্রাইভার সম্পর্কিত কোনও সফ্টওয়্যার ইনস্টল করেছেন. .
AD এর পরে নিবন্ধটি অব্যাহত রয়েছে
পদক্ষেপ 15: উপভোগ করুন
ভাল হয়েছে, আপনি সবেমাত্র একটি গেমিং পিসি তৈরি করেছেন. এখন, আপনি যে সমস্ত গেমিং গুডি চান তা দিয়ে আপনি আপনার পিসি লোড করতে পারেন. একটি গেমিং পিসি আপগ্রেডযোগ্য, সুতরাং আপনি যদি আরও বেশি স্টোরেজ প্রয়োজন হয় তবে আপনার আরও যুক্ত করতে সক্ষম হওয়া উচিত. . যেহেতু আপনি এটি নিজেই করেছেন, আপনার পিসিটিও কী টিক দেয় তা বুঝতে সক্ষম হওয়ার অতিরিক্ত সুবিধা আপনার রয়েছে.
আশা করি, এই গাইডটি ব্যবহার করে আপনি কীভাবে গেমিং পিসি তৈরি করবেন তা শিখিয়েছেন.
AD এর পরে নিবন্ধটি অব্যাহত রয়েছে
গেমিং পিসি কত খরচ করে?
আপনি প্রায় 600 ডলার থেকে যে কোনও জায়গা থেকে একটি গেমিং পিসি তৈরি করতে পারেন. আমরা সেই পয়েন্টের অধীনে একটি নির্মাণের পরামর্শ দেব না. আপনি যদি নগদ অর্থের জন্য আটকে থাকেন তবে একটি বাষ্প ডেক আপনার সেরা বাজেটের বিকল্প হতে পারে.
AD এর পরে নিবন্ধটি অব্যাহত রয়েছে
একবার আপনি কী জন্য আপনার পিসি ব্যবহার করতে যাচ্ছেন তা স্থির করে নিলে আপনি মোটামুটি বাজেটের পরিকল্পনা শুরু করতে পারেন. আমাদের অনুমান অনুসারে, একটি সক্ষম গেমিং পিসি তৈরি করা যা 1440p ফ্রেমরেটকে ধাক্কা দিতে পারে তার জন্য প্রায় 1000 ডলার ব্যয় হবে.
AD এর পরে নিবন্ধটি অব্যাহত রয়েছে
AD এর পরে নিবন্ধটি অব্যাহত রয়েছে
আপনি যদি এই পৃষ্ঠায় কোনও পণ্য লিঙ্কে ক্লিক করেন তবে আমরা একটি ছোট অনুমোদিত কমিশন উপার্জন করতে পারি.

যদিও একটি পিসি তৈরি করা লেগো সেট একসাথে রাখার মতো সহজ, আপনার শুরু করার আগে বিল্ডিং ব্লকগুলি সম্পর্কে জানা উচিত. পিসি বিল্ডগুলিতে অনেকগুলি স্টাইল এবং ব্যবহার থাকতে পারে তবে কিছু উপাদানগুলি মৌলিক এবং প্রতিটি পিসির অংশ হতে হবে.
আসুন প্রতিটি অংশের মূল বিষয়গুলি শিখি, আমরা কি করব??
বিনামূল্যে ইবুক!
?
আপনার পিসি বিল্ডিংটিকে আরও সহজ করতে অফলাইন অনুলিপি ধরুন!
কিভাবে একটি পিসি তৈরি করবেন
10 ধাপে ধাপে ধাপে বিল্ড গাইড
আপনার হাত নোংরা করার সময়! হ্যান্ড-অন পিসি বিল্ডিং নির্দেশের সাথে, এমনকি প্রথম টাইমাররা একটি চমত্কার, উচ্চ-পারফরম্যান্স পিসি তৈরি করতে পারে. একটি স্ক্রু ড্রাইভার ধরুন, সেই আবেগকে বাড়িয়ে দিন এবং আপনি যেতে ভাল!
শুরু করার আগে, কিছু সহজ জিনিস প্রস্তুত করা হবে:
- একটি চৌম্বকীয় স্ক্রু ড্রাইভার.
- জিপ টাইস /ভেলক্রো স্ট্রিপস এবং একজোড়া কাঁচি.
- আপনার পিসি তৈরি করতে একটি পরিষ্কার নন পরিবাহী পৃষ্ঠ
- একটি দীর্ঘ নিঃশ্বাস নিন, প্রথমে ম্যানুয়ালগুলি পড়ুন এবং আপনি যেতে ভাল!
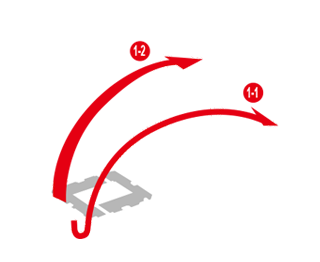
মাদারবোর্ডের পিনগুলি দুর্বল, তাই সেগুলি বাঁক না দেওয়ার জন্য সতর্ক থাকুন.

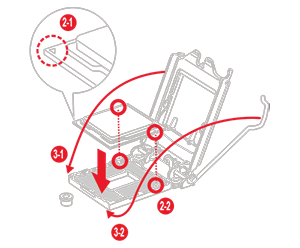
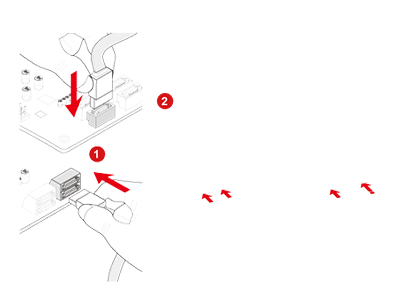
- সকেটে চিহ্নিত গাইড নচগুলির সাথে সিপিইউতে মুদ্রিত খাঁজটি লাইন করুন; সাবধানতার সাথে এটি সকেটের ভিতরে sert োকান.
- সিপিইউ সঠিকভাবে স্থাপন করা হয়েছে তা নিশ্চিত করুন তারপরে id াকনাটি পুনরায় সুরক্ষা করুন এবং এটি প্রসেসরে লক করুন.
সিপিইউ সকেট পিনগুলি (বা সিপিইউ পিনগুলি) সম্পর্কে সাবধানতা অবলম্বন করুন, কারণ এটি নন মডুলার দিয়ে তৈরি, যা নরম উপাদান. এগুলি অত্যন্ত ভঙ্গুর, যে কোনও সামান্য সংঘর্ষ পিনগুলি বাঁকতে পারে, যা কার্যকরী ত্রুটি হতে পারে.
- মেমরি সকেটের শেষ প্রান্তে অবস্থিত লক/ইজেক্টর ট্যাবগুলিতে নীচে টিপছে.
- মাদারবোর্ড ম্যানুয়ালটিতে বর্ণিত মেমরি মডিউল ইনস্টলেশন অর্ডারটি পরীক্ষা করুন এবং নিশ্চিত করুন যে কোন প্রস্তাবিত মেমরি স্লটগুলি প্রথমে sert োকানোর জন্য.
- রিটেনশন ক্লিপগুলি উপরের দিকে ধাক্কা দেওয়ার সাথে সাথে মডিউলটি লক করার সাথে সাথে আপনি একটি “ক্লিক” না শুনে মডিউলগুলি নীচে চাপুন.
প্রস্তাবিত ক্রমটি প্রথমে কোন মেমরি স্লট ইনস্টল করা উচিত তা বিভিন্ন মাদারবোর্ডের কারণে পৃথক হতে পারে. .
- মুভ এবং মিটারে রাইজার স্ক্রুগুলি বেঁধে দিন..
- .
- এটিকে স্ট্যান্ডঅফের দিকে ধাক্কা দিন এবং সামান্য স্ক্রু দিয়ে এটি সুরক্ষিত করুন.
কিছু উচ্চ-শেষের মাদারবোর্ডগুলি এম এর জন্য বিশেষ শীতল সমাধান নিয়ে আসে.2, যেমন মি.2 ield াল এবং মি.2 ফোরজআর. .
- মাদারবোর্ডের পিছনে পিছনে প্লেটটি মাউন্ট করুন. (যদি তোমার একটি থাকে)
- প্রসেসরের পৃষ্ঠে তাপীয় পেস্টের একটি ড্রপ প্রয়োগ করুন.
- .
- কুলারটি উল্লম্বভাবে কম করুন এবং এটি সিপিইউতে রাখুন. এটি ক্রমান্বয়ে বিপরীত স্ক্রুগুলি সমানভাবে শক্ত করা সুরক্ষিত করুন.
আপনি সঠিক পরিমাণের সাথে তাপীয় পেস্ট প্রয়োগ করেন তা নিশ্চিত করুন. খুব সামান্য বা খুব বেশি খারাপ যোগাযোগের কারণ হতে পারে বা তুলনামূলকভাবে সকেটে পেস্ট পাবে.
স্ক্রুগুলি সঠিকভাবে শক্ত করা হয়েছে তা নিশ্চিত করুন, এবং কোণে প্রয়োগ করা চাপ এমনকি সিপিইউ ক্ষতি এবং শীতল কর্মক্ষমতা অবক্ষয় এড়াতে হবে.

- .
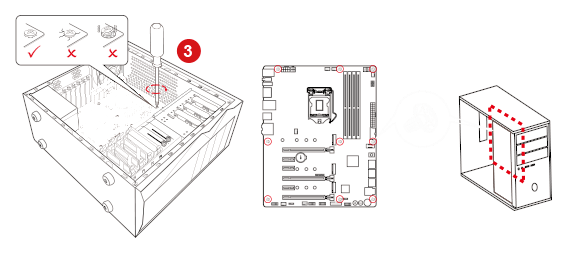
- আপনার মাদারবোর্ডটি নিয়ে যান এবং কেসটিতে 45 ডিগ্রি কোণে আলতো করে এটি কমিয়ে দিন.
- মামলার স্ট্যান্ড-অফগুলির সাথে মাদারবোর্ডে মাউন্টিং গর্তগুলি মেলে.
- সরবরাহিত প্রতিটি স্ক্রু দিয়ে বোর্ডটি সুরক্ষিত করুন.
স্ক্রুগুলি ছেড়ে যাবেন না – অস্থির চলাচল এড়াতে মাদারবোর্ডটি সুরক্ষিত করতে একটি শক্ত মাউন্ট খুব সহায়ক হবে.
- মাদারবোর্ডের সাতা বন্দরগুলির সাথে সাটা তারের এক প্রান্ত এবং অন্য প্রান্তটি স্টোরেজ ডিভাইসে সংযুক্ত করুন (২..5 ’’ ইঞ্চি) নিজেই.
ক্ষতি এড়াতে আপনি হার্ড ড্রাইভটি শক্ত করে মাউন্ট করেছেন তা নিশ্চিত করুন.
- .
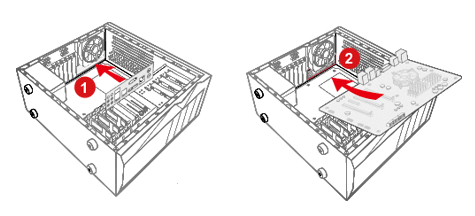
- স্লটের পিছনে অবস্থিত ছোট প্লাস্টিকের লকটি পিছনে চাপ দিয়ে পিসিআই-ই স্লটটি আনলক করুন.
- দুটি হাত দিয়ে কার্ডটি ধরে রাখুন, কেসটিতে গ্রাফিক্স কার্ডটি কম করুন এবং মাদারবোর্ডের পিসিআই-ই স্লটে ইনস্টল করুন.
- চ্যাসিসের পিছনে প্রয়োজনীয় স্ক্রু সহ গ্রাফিক্স কার্ডটি সুরক্ষিত করুন.
কিছু উচ্চ-শেষ কার্ডগুলি দীর্ঘ হয় বা আরও বেশি পিসিআই স্পেস ব্যবহার করে. গ্রাফিক্স কার্ডটি ফিট করতে পারে এমন উপযুক্ত কেসটি বেছে নিতে আগেই এটি পরীক্ষা করে দেখুন.
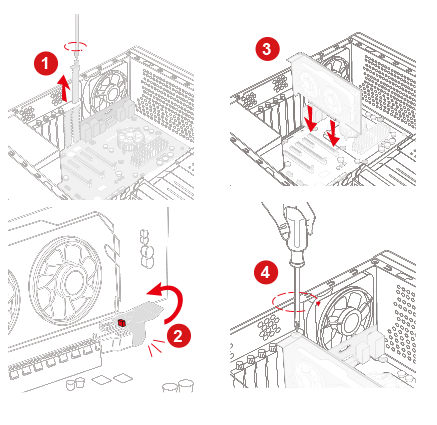
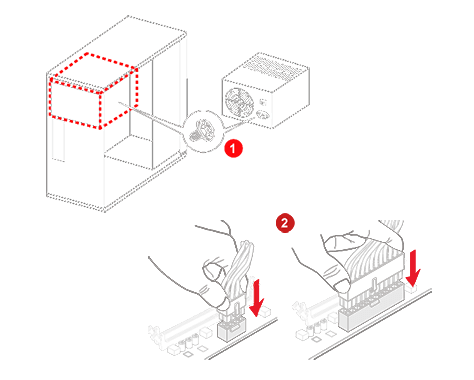
- চ্যাসিসে পাওয়ার সাপ্লাই (পিএসইউ) মাউন্ট করুন এবং সমস্ত স্ক্রু দিয়ে এটি সুরক্ষিত করুন.
- মাদারবোর্ডের সকেটে 24-পিন পাওয়ার সংযোগকারীকে সংযুক্ত করুন
- 8-পিন সিপিইউ পাওয়ার সংযোগকারীকে মাদারবোর্ডে সংযুক্ত করুন.
- গ্রাফিক্স কার্ডের সাথে 6+2 পিন পিসিআই-ই কেবল সংযুক্ত করুন (এটি গ্রাফিক্স কার্ড পণ্য দ্বারা পৃথক হতে পারে)
- হার্ড ড্রাইভে আপনার সাটা পাওয়ার সংযোগকারী ক্লিপ
- .ছ. ডিভিডি/সিডি অপটিকাল ড্রাইভ).
বিদ্যুৎ সরবরাহের জন্য উপযুক্ত ওয়াটেজ নির্বাচন করা অপরিহার্য. আপনার বিল্ডের দ্বারা প্রয়োজনীয় পাওয়ারের অনুমান পেতে আপনি অনলাইন পিসি বিল্ড সিমুলেটর যেমন পিসি পার্ট পিকার বা এমএসআই পাওয়ার সাপ্লাই ক্যালকুলেটর সরঞ্জাম ব্যবহার করতে পারেন. ভবিষ্যতের আপগ্রেডগুলির জন্য অ্যাকাউন্টে সামান্য হেডরুম সহ একটি বিদ্যুৎ সরবরাহ কেনার বিষয়টি নিশ্চিত করুন.
- পাওয়ার সুইচ / রিসেট সুইচ / পাওয়ার এলইডি / এইচডিডি (হার্ড ড্রাইভ) এলইডি কেবলটি মাদারবোর্ড জেএফপি 1 পিন শিরোনামে সংযুক্ত করুন.
- মাদারবোর্ডে ইউএসবি পিন শিরোনামগুলিতে সামনের ইউএসবি কেবলগুলি সংযুক্ত করুন
- ইউএসবি 3.0 / ইউএসবি 2.0 কেবল ইউএসবি 3.0 / ইউএসবি 2.0 পিন শিরোনাম.
- ফ্রন্ট ইউএসবি টাইপ-সি কেবলটি ফ্রন্ট ইউএসবি টাইপ-সি পিন শিরোনাম
- অডিও (স্পিকার) কেবলটি মাদারবোর্ড জাউড 1 পিন শিরোনামে সংযুক্ত করুন.
পিসি কেস কেনার আগে মাদারবোর্ডে সর্বাধিক পরিমাণ ইউএসবি পোর্টগুলি পরীক্ষা করুন. আপনি যে কেসটি কিনতে চান তা নিশ্চিত করুন যে মাদারবোর্ডের মতো পর্যাপ্ত ইউএসবি পোর্টগুলিও সমর্থন করে.
- ইন্টারনেট সহ একটি কম্পিউটারে, “উইন্ডোজ 10 মিডিয়া সরঞ্জাম *” অনুসন্ধান করুন, 10 টি ইনস্টলেশন ডাউনলোড করুন এবং এটি চালান এবং ইউএসবিতে চিত্রটি তৈরি করতে বেছে নিন, প্রোগ্রামটি ফর্ম্যাট করবে বা মুছবে, ড্রাইভটি
- একটি মাদারবোর্ড রিয়ার ইউএসবি পোর্টে ইনস্টলেশন ইউএসবি প্লাগ করুন, নীল সন্নিবেশ সহ একটি দ্রুত লাল ইউএসবি 3 পোর্ট বা সাধারণ ইউএসবি 3 চয়ন করুন. কম্পিউটারটি চালু করুন, সাধারণত প্রথম বুটে বায়োস লোড হয়ে যায়, আপনি পিসি পুনরায় চালু করে সংরক্ষণ এবং প্রস্থান করতে পারেন. ইউএসবি লোড করা উচিত এবং আপনি ইনস্টলেশন নিয়ে এগিয়ে যেতে পারেন.
* আপনি ইনস্টল করতে চান সর্বশেষ/প্রস্তাবিত সংস্করণের উপর নির্ভর করে
- ওএস ডিভাইস (সিডি / ইউএসবি) sert োকান
- ওএস ইনস্টলেশন পদক্ষেপগুলি অনুসরণ করুন
- ওয়েবসাইট থেকে সর্বশেষতম ডিভাইস ড্রাইভার ডাউনলোড করুন এবং ইনস্টল করুন.
পিসি কেস কেনার আগে মাদারবোর্ডে সর্বাধিক পরিমাণ ইউএসবি পোর্টগুলি পরীক্ষা করুন. আপনি যে কেসটি কিনতে চান তা নিশ্চিত করুন যে মাদারবোর্ডের মতো পর্যাপ্ত ইউএসবি পোর্টগুলিও সমর্থন করে.
আমার প্রয়োজনের জন্য কীভাবে সেরা পিসি তৈরি করবেন?
তীব্র গেমিং বা ভারী মাল্টিমিডিয়া উত্পাদনের জন্য আপনার কি পিসি দরকার?? আপনার অংশগুলি বেছে নেওয়ার সময় আপনাকে কিছু টিপস বিবেচনা করতে হবে.
আপনার পিসিতে কিছু আরজিবি যুক্ত করুন
- আপনার বিল্ড তালিকা পিসিপার্টপিকার পরিকল্পনা করুন
- ডান পিএসইউ এমএসআই পাওয়ার সাপ্লাই ক্যালকুলেটরটি চয়ন করুন
আপনার বিল্ড তালিকার পরিকল্পনা করুন: পিসিপার্টপিকার
আপনার বিল্ড তালিকার পরিকল্পনা করুন: পিসিপার্টপিকার

পিসি তৈরির সবচেয়ে গুরুত্বপূর্ণ অংশটি নিজেই “বিল্ডিং” নয়; এটি একটি অংশের তালিকা তৈরি করছে যা আপনার প্রয়োজনের সাথে একত্রিত হয়. সর্বোপরি, যা আপনার পিসির পারফরম্যান্সকে উল্লেখযোগ্যভাবে প্রভাবিত করে তা হ’ল এর হার্ডওয়্যার. আপনার নিজের বিল্ড তালিকাটি তৈরি করতে আপনাকে সহায়তা করতে, আমরা পিসিপার্টপিকার (https: // পিসিপার্টপিকার) এর মতো সহায়ক সংস্থান ব্যবহার করার পরামর্শ দিই.com/)
পিসিপার্টপিকার ব্যবহারকারী পর্যালোচনা সহ অত্যাশ্চর্য বিস্তারিত পণ্য সম্পর্কিত তথ্য সরবরাহ করে এবং এমনকি পণ্য কেনার লিঙ্কগুলি সরবরাহ করে. ওয়েবসাইটটি বিভিন্ন অঞ্চলে স্যুইচ করে, লিঙ্কগুলি কিনুন স্থানীয় ই-টেলার ওয়েবসাইটের সাথে একইভাবে লিঙ্ক করা হবে. এটি কেবল উপলভ্য পণ্যগুলির বিস্তৃত নির্বাচন সরবরাহ করে না, তবে এটি আপনাকে কেনার জন্য মূল্য এবং স্থানের একটি রেফারেন্স দেয় – আপনাকে সময় এবং অর্থ উভয়ই বাঁচাতে সহায়তা করে.
আপনি যখন আপনার আদর্শ বিল্ড তালিকা তৈরি শেষ করেন, তখন কয়েকটি ফাংশন রয়েছে যা আপনি লাভ করতে পারেন:
সংরক্ষণ. আপনি যদি এখনও এই মুহুর্তে আপনার রগ কেনার সিদ্ধান্ত না নিয়ে থাকেন তবে প্রথমে পরিকল্পিত বিল্ড তালিকাটি সংরক্ষণ করুন. তুলনা এবং বিবেচনা করার জন্য আপনার সময় নিন.
ভাগ. আপনার পিসি বিল্ড সম্পর্কে আরও মতামতের জন্য আপনি আপনার বন্ধুদের সাথে বা ফোরামে বিল্ড তালিকাটি ভাগ করতে পারেন.
. সহজেই আপনার ই-টেইলারের সাইটগুলিতে পণ্যটি কেনার জন্য একটি সহজ বোতাম.
ডান পিএসইউ চয়ন করুন: এমএসআই পাওয়ার সাপ্লাই ক্যালকুলেটর
আপনার জন্য সঠিক পিএসইউ চয়ন করুন: এমএসআই পাওয়ার সাপ্লাই ক্যালকুলেটর
উপাদানগুলি কেনার সময় অনেক নির্মাতাদের মুখোমুখি একটি বড় প্রশ্ন হ’ল “আমার পিসি কাজ করার জন্য আমার পিএসইউতে আমার কতটা ওয়াটেজ দরকার??”এই সমস্যাটিকে অবমূল্যায়ন করবেন না, একটি অযোগ্য ওয়াটেজ সহ পিএসইউ কেনার জন্য ভবিষ্যতে আপনার পিসির আপগ্রেডিবিলিকে প্রভাবিত করতে পারে. আপনি যদি অপর্যাপ্ত বিদ্যুৎ সরবরাহের সাথে পিএসইউ কিনে থাকেন তবে এটি অন্যান্য উপাদান যেমন জিপিইউর জন্য পর্যাপ্ত আউটপুট কেবল নাও থাকতে পারে. এছাড়াও, আপনার কম্পিউটার সময়ে সময়ে হিচাপ এবং সিস্টেম ক্র্যাশগুলির মুখোমুখি হতে পারে. কিছু ক্ষেত্রে, এটি কারণ হতে পারে . এমএসআই পাওয়ার সাপ্লাই ক্যালকুলেটর (https: // www.এমএসআই..
এখানে দেখুন: https: // www.এমএসআই.com/পাওয়ার-সরবরাহ-ক্যালকুলেটর
আপনার কনফিগারেশন পূরণ করুন
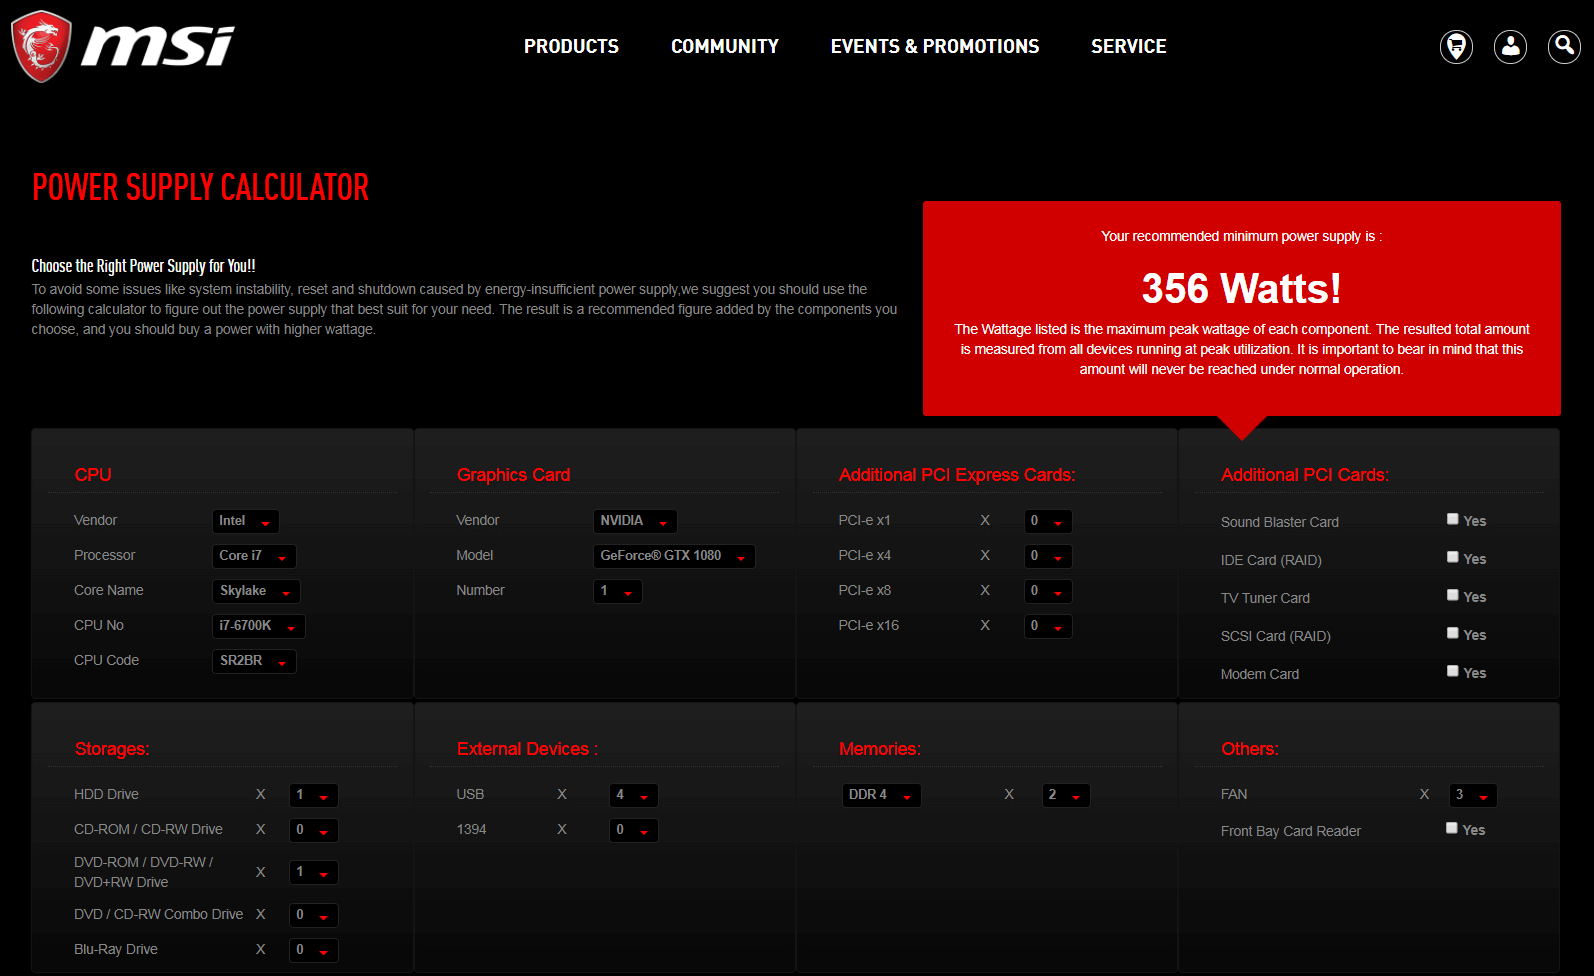
আপনার পিসি কনফিগারেশন পূরণ করে, এমএসআই পাওয়ার সাপ্লাই ক্যালকুলেটর (https: // www.এমএসআই.com/পাওয়ার-সাপ্লাই-ক্যালকুলেটর) আপনার পিসির জন্য সিস্টেমটি স্থিরভাবে চালানোর জন্য স্বয়ংক্রিয়ভাবে ওয়াটেজ গণনা করবে. .
FAQ
?
. আপনি একা নন, আমরা কিছু সাধারণভাবে জিজ্ঞাসিত প্রশ্নগুলি তালিকাভুক্ত করেছি এবং বিভিন্ন বিভাগে সংগঠিত করেছি.
সিপিইউগুলি কম্পিউটারের মস্তিষ্ক, মূলত কম্পিউটার নির্দেশাবলী ব্যাখ্যা করার জন্য এবং কম্পিউটার সফ্টওয়্যারটিতে ডেটা প্রক্রিয়াকরণের জন্য দায়বদ্ধ.
সিপিইউকে শীতল রাখতে এবং সিপিইউকে ওভারহিটিং থেকে রোধ করতে একটি সিপিইউ কুলারটি ভক্ত এবং হিটসিংকগুলি সংকলিত করা হয়েছে যা গুরুত্বপূর্ণ উপাদানটিকে সুরক্ষিত করার জন্য সিস্টেমটি বন্ধ করে দিতে পারে.
. এটি একটি কম্পিউটারের বিভিন্ন উপাদানগুলির পাশাপাশি এই উপাদানগুলির মধ্যে যোগাযোগ এবং সংক্রমণ পরিচালনা করে.
র্যাম অস্থায়ীভাবে ডেটা সঞ্চয় করতে ব্যবহৃত হয়, সিপিইউ হার্ড ড্রাইভ থেকে ডেটা অ্যাক্সেস করতে পারে এমন গতি বাড়িয়ে. মেমরির ক্ষমতা এবং ফ্রিকোয়েন্সি উভয়ই কম্পিউটারের কার্যকারিতা প্রভাবিত করে.
গ্রাফিক্স কার্ড কি?
গ্রাফিক্স কার্ড কম্পিউটার থেকে ডেটা নেয় এবং এটি একটি প্রদর্শন মনিটরে পাঠ্য, চিত্র এবং রঙ হিসাবে আউটপুট দেয়.
এইচডিডি এবং এসএসডি এর মধ্যে পার্থক্য কী?
.
সলিড স্টেট ড্রাইভ (এসএসডি): নিম্ন ক্ষমতা, মাঝারি আকার, উচ্চতর দাম তবে দ্রুত গতি.
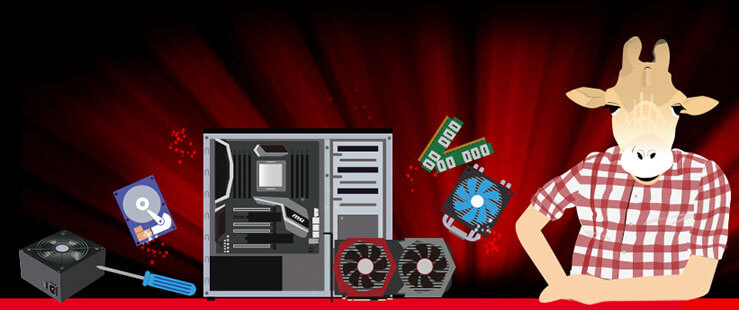
গেমিং কম্পিউটার তৈরি করার জন্য আমার কী দরকার?
- সিপিইউ
- মাদারবোর্ড
- গ্রাফিক্স কার্ড
- সিপিইউ কুলার
- স্মৃতি
- স্টোরেজ ডিভাইস (এইচএইচডি বা এসএসডি)
- বিদ্যুৎ সরবরাহ
- কেস
- পেরিফেরিয়ালস (কীবোর্ড, মাউস, হেডসেট)
- মনিটর
ডাব্লু কি ইউএসবি 3.2 জেনার 1, ইউএসবি 3..2 জেনার 2×2?
ইউএসবি-আইএফ সংস্থা ঘোষণা করেছে যে ইউএসবি 3.5 জিবিপিএস পর্যন্ত সক্ষম 2 সংযোগকারীগুলি এখন ইউএসবি 3 হিসাবে শ্রেণিবদ্ধ করা হবে.2 জেনারেল 1. যখন নতুন ইউএসবি 3.2 সংযোগকারী, 10 জিবিপিএস পর্যন্ত সক্ষম (সুপারস্পিড+) এখন ইউএসবি 3 হিসাবে শ্রেণিবদ্ধ করা হবে.2 জেনার 2. ইউএসবি 3.2 জেনার 2×2 20 জিবিপিএস পর্যন্ত সক্ষম, এবং কেবল টাইপ-সি সংযোগকারীকে সমর্থন করে.
বিশদগুলির জন্য, আপনি দেখতে পারেন: https: // www.এমএসআই.com/ব্লগ/নতুন-ইউএসবি-স্ট্যান্ডার্ড-ইউএসবি -3-2-2-জেন -1-জেন 2-ব্যাখ্যা
আমার পিসি কাজ করার জন্য আমার পিএসইউতে আমার কতটা ওয়াটেজ দরকার?
আপনার যে ওয়াটেজ দরকার তা আপনার পিসি কনফিগারেশনের উপর নির্ভর করে, আপনি https: // wwww চেক করতে পারেন.এমএসআই.com/ পাওয়ার-সাপ্লাই-ক্যালকুলেটর/ আপনার পিসিটি সঠিক পিএসইউ বাছাই করতে হবে এমন ওয়াটেজটি অনুমান করার জন্য.
?
- মাদারবোর্ডে সকেটকে সমর্থন করে এমন সংশ্লিষ্ট বন্ধনী সহ একটি সিপিইউ কুলার চয়ন করুন.
- প্রতিটি সিপিইউ কুলার একটি পৃথক তাপীয় নকশা শক্তি (টিডিপি) সমর্থন করে, এটি তাপের আউটপুটটির উপরের পরিসীমা নির্দেশ করে যা এটি পরিচালনা করতে পারে. .
- আপনার কেস ফিট করে এমন একটি কুলার চয়ন করুন. শক্তিশালী কুলারগুলিতে প্রায়শই বড় তাপের ডুবে থাকে, তাই এমন একটি কুলার চয়ন করা গুরুত্বপূর্ণ যা অন্যান্য উপাদানগুলিকে বাধা না দিয়ে আপনার ক্ষেত্রে ফিট করতে পারে.
কিভাবে একটি পিসি কেস চয়ন করবেন?
- আপনার মাদারবোর্ড, ইএটিএক্স, এটিএক্স, এমএটিএক্স বা মিনি-আইটিএক্সের ফর্ম ফ্যাক্টরটি কী?
- আপনি কী হার্ডওয়্যার ইনস্টল করতে চান?
- আপনি কী ধরণের কুলিং সিস্টেম ব্যবহার করতে চান?
- ?
কীভাবে পিসি বিল্ডিং প্রযুক্তি সমর্থন
ধাপে ধাপে পিসি কীভাবে তৈরি করবেন?
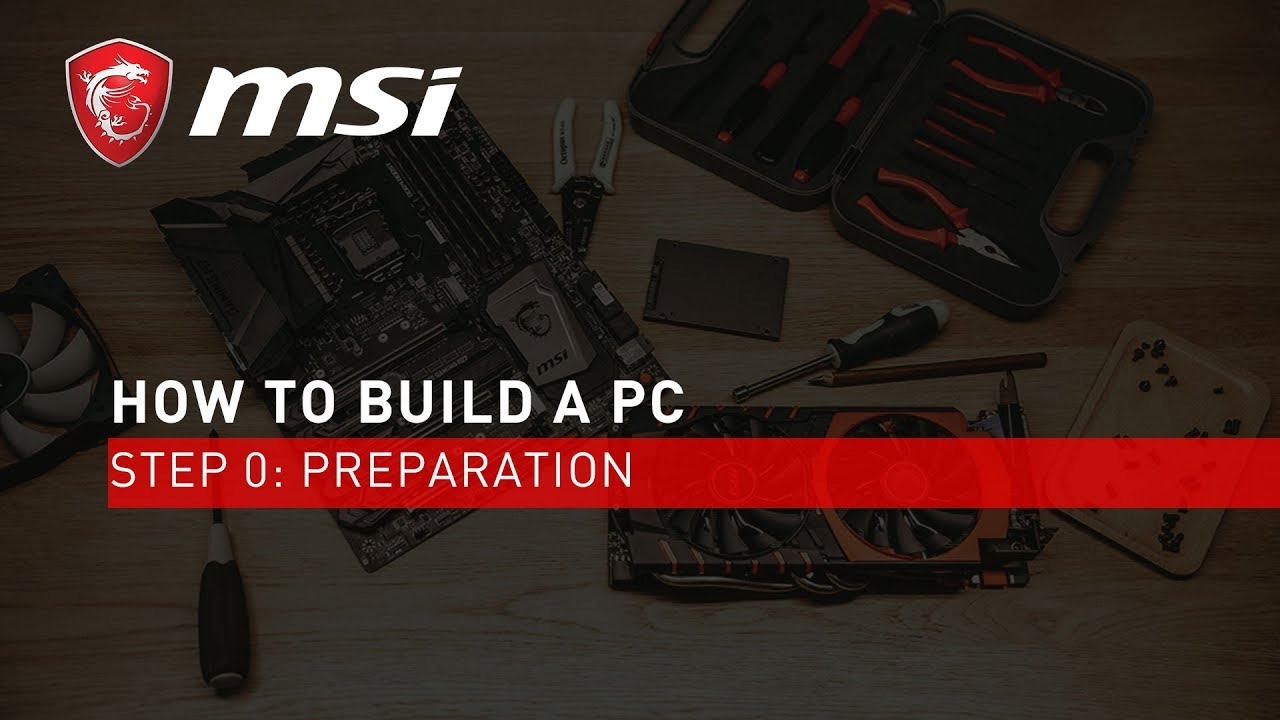
- পদক্ষেপ 0: প্রস্তুতি
- পদক্ষেপ 2: মেমরি ইনস্টলেশন
- পদক্ষেপ 3: মি.2 ইনস্টলেশন
- পদক্ষেপ 4: সিপিইউ কুলার ইনস্টলেশন
- পদক্ষেপ 5: মাদারবোর্ড ইনস্টলেশন
- পদক্ষেপ 6: স্টোরেজ ইনস্টলেশন
- পদক্ষেপ 7: গ্রাফিক্স কার্ড ইনস্টলেশন
- পদক্ষেপ 8: বিদ্যুৎ সরবরাহ ইনস্টলেশন
- পদক্ষেপ 9: ফ্রন্ট প্যানেল সংযোগ এবং কেবল পরিচালনা
- পদক্ষেপ 10: অপারেশন সিস্টেম ইনস্টলেশন
?
- মেমরি সকেটের শেষ প্রান্তে অবস্থিত ইজেক্টর ট্যাবগুলিতে নীচে টিপুন.
- মাদারবোর্ড ম্যানুয়ালটিতে বর্ণিত মেমরি মডিউল ইনস্টলেশন অর্ডারটি পরীক্ষা করুন এবং নিশ্চিত করুন যে কোন প্রস্তাবিত মেমরি স্লটগুলি প্রথমে sert োকানোর জন্য.
- রিটেনশন ক্লিপগুলি উপরের দিকে ধাক্কা দেওয়ার সাথে সাথে মডিউলটি লক করার সাথে সাথে আপনি একটি “ক্লিক” না শুনে মডিউলগুলি নীচে চাপুন.
আরজিবি ডিভাইস কীভাবে ইনস্টল করবেন?
- কেনা আরজিবি আনুষাঙ্গিক এবং মাদারবোর্ডে পিন শিরোনামগুলির সংজ্ঞাটি পরীক্ষা করুন (উদাহরণস্বরূপ, 12 ভি/5 ভি)
- মাদারবোর্ডে আরজিবি শিরোনামে 4-পিন (3-পিন) আরজিবি সংযোগকারীটি প্লাগ করুন
- অ-ফ্যান পণ্যগুলির জন্য, বিদ্যুৎ সরবরাহের 4-পিন সংযোগকারীদের সাথে সংযুক্ত করুন
.এমএসআই.com/ল্যান্ডিং/মিস্টিক-লাইট-আরজিবি-গেমিং-পিসি/মিস্টিক-লাইট
সিপিইউ, কেন্দ্রীয় প্রক্রিয়াকরণ ইউনিট. এর কাজটি হ’ল আপনার কম্পিউটারে চলমান সফ্টওয়্যারটির জন্য নির্দেশাবলী কার্যকর করা. সিপিইউগুলির জন্য প্রধান ব্র্যান্ডগুলি হ’ল ইন্টেল এবং এএমডি, এবং একটি বেছে নেওয়া আপনার প্রয়োজন এবং বাজেটের সাথে খাপ খায় যার সাথে নেমে আসে. ইন্টেল এবং এএমডি পণ্যগুলি বিনিময়যোগ্য নয়, কারণ তারা মাদারবোর্ডের সাথে সংযোগ স্থাপনের জন্য বিভিন্ন সকেট ব্যবহার করে.
ইন্টেল এলজিএ ব্যবহার করে, এবং সকেটে পিন রয়েছে, সিপিইউকে সিপিইউতে সিপিইউ ফিট করার সময় সহজতর তবে যত্নের প্রয়োজন হয়. এএমডি উভয় পিজিএ ব্যবহার করে, সিপিইউতে পিন এবং তাদের উচ্চ প্রান্তের থ্রেড্রিপার সিপিইউগুলির জন্য এলজিএ ব্যবহার করে. এন্ট্রি-লেভেল সিপিইউগুলির কম প্রসেসিং এবং মাল্টিটাস্কিং ক্ষমতা সহ কম মূল গণনা রয়েছে. ইন্টেলের ক্যাসকেড লেক বা এএমডির ইপিওয়াইসি সার্ভার সিপিইউগুলির মতো হাই-এন্ড প্রসেসরগুলি উচ্চ মূল গণনা নিয়ে আসে এবং সুরক্ষা, ভার্চুয়ালাইজেশন বা প্রচুর পরিমাণে মেমরি ক্যাশে বৈশিষ্ট্যযুক্ত.
গুরুত্বপূর্ণভাবে গ্রাহকদের জন্য মূল এবং থ্রেড গণনা. সমস্ত সিপিইউতে কোর রয়েছে তবে সাম্প্রতিক সিপিইউগুলি প্রতিটি কোরকে দুটি ভার্চুয়াল কোরে বিভক্ত করে থ্রেডস নামে পরিচিত, 30% পর্যন্ত অতিরিক্ত পারফরম্যান্স যুক্ত করে. আরও কোর একই সাথে আপনার সিস্টেমে আরও অ্যাপ্লিকেশনগুলি সুচারুভাবে চালিত করে তোলে. সুতরাং যদি আপনি কোনও গেম খেলার সময় ব্রডকাস্টিং সফ্টওয়্যার ব্যবহার করে টুইচ স্ট্রিমিং করছেন তবে আপনার আরও কোর এবং থ্রেড সহ একটি সিপিইউ প্রয়োজন.
সিপিইউগুলি প্রচুর তাপ উত্পাদন করে. উচ্চ তাপমাত্রা গুরুত্বপূর্ণ উপাদানগুলি সুরক্ষার জন্য সিস্টেমটি বন্ধ করে দিতে পারে এবং এমনকি স্থায়ী ক্ষতির কারণ হতে পারে. সিপিইউ চালানো শীতল রাখার জন্য ভক্ত এবং হিটসিংকগুলি তাই প্রয়োজনীয়. কিছু উচ্চ-শেষ সিপিইউ ব্যতীত, বেশিরভাগ বক্সযুক্ত সিপিইউগুলি সংশ্লিষ্ট সিপিইউ কুলার দিয়ে বান্ডিল করা হয় যা তাপ অপচয় হ্রাসের জন্য প্রাথমিক দাবিগুলি পূরণ করতে পারে.উন্নত সিস্টেমের পারফরম্যান্সের জন্য, এটি আরও ভাল সিপিইউ কুলার কেনার পরামর্শ দেওয়া হয়.
কুলারটি তাপ অপচয়কে দুটি ধরণের মধ্যে শ্রেণিবদ্ধ করা যেতে পারে: তরল কুলিং এবং এয়ার কুলিং. এয়ার কুলারগুলি তাদের উপস্থিতি এবং বায়ুপ্রবাহের দিকের উপর নির্ভর করে আরও টাওয়ার-স্টাইল, ডাউনড্রাফ্ট এবং আপডেট্রাফ্ট কুলারগুলিতে শ্রেণিবদ্ধ করা যেতে পারে. ব্যবহারকারীদের একটি কুলার চয়ন করা উচিত যা তাদের পণ্য এবং পরিস্থিতিতে ফিট করে.


সিপিইউ কুলারটি বেছে নেওয়ার সময়, নিম্নলিখিত বিবেচনাগুলি বিবেচনা করুন:
- কুলারদের সাথে সম্পর্কিত বন্ধনী সরবরাহ করা দরকার, কারণ মাদারবোর্ডের সকেটের উপর নির্ভর করে বন্ধনী অবস্থান কিছুটা পরিবর্তিত হতে পারে.

মাদারবোর্ড, যাকে মেইনবোর্ডও বলা হয়, আপনার কম্পিউটারের সমস্ত উপাদানকে আপনার প্রসেসর, মেমরি মডিউল, গ্রাফিক্স এবং এক্সপেনশন কার্ড, হার্ড ড্রাইভ এবং আপনার নেটওয়ার্ক, কীবোর্ড, মাউস এবং আরও অনেকের জন্য সংযোগগুলি সংযুক্ত করে লিঙ্ক করে.
মাদারবোর্ডের মাত্রা
কাপড়ের মতো, মাদারবোর্ডগুলি বিভিন্ন আকারে আসে. সাধারণ আকারের অন্তর্ভুক্ত: এটিএক্স (30..4 সেমি) 、 মাইক্রো-এটিএক্স (24.4 সেমি x 24.4 সেমি) এবং মিনি-আইটিএক্স (17 সেমি x 17 সেমি), তিন ধরণের মাদারবোর্ডের মাত্রা.


. চিপসেট মাদারবোর্ডে বিকল্প এবং সংযোগ সরবরাহ করে এবং উচ্চমূল্যের চিপসেটগুলি আপনাকে আরও বৈশিষ্ট্য সরবরাহ করে. অনেকগুলি বিভিন্ন চিপসেট রয়েছে, সুতরাং সহজ করার জন্য, চিপসেট নম্বরটি যত বেশি হবে, আপনার মাদারবোর্ডের তত বেশি কার্যকারিতা থাকবে.
. . . . . . .
আসুন স্মৃতি সম্পর্কে কথা বলি, এটি র্যাম নামেও পরিচিত. র্যাম আপনার অপারেটিং সিস্টেমকে ধীর স্টোরেজ ডিভাইসগুলি থেকে অ্যাক্সেস না করে খুব দ্রুত অ্যাক্সেস অঞ্চলে আরও ডেটা রাখার অনুমতি দেয়. সর্বশেষতম ডেস্কটপ সংস্করণটি ডিডিআর 5, যা একটি স্নাপিয়ার প্রতিক্রিয়া পিসির জন্য দরকারী. এছাড়াও র্যাম আপনার বিল্ড এবং থিমের সাথে মেলে শীর্ষে আরজিবি আলো নিয়ে আসতে পারে.
আপনার যে পরিমাণ র্যাম প্রয়োজন তা. . আমরা একটি এনভিএমই এম এ উইন্ডোজ ইনস্টল করার মতো 16 টি জিগ মেমরির সুপারিশ করব.2 ড্রাইভ, আপনার সিস্টেমটি 20 সেকেন্ডের মধ্যে বুট করতে পারে এবং এটি চটজলদি এবং প্রতিক্রিয়াশীল. .
সর্বদা পাওয়ার অফ সহ উপাদান এবং র্যাম ইনস্টল করুন. . আপনি যদি দ্রুত র্যাম কিনে থাকেন, বিআইওএসে আপনি আপনার র্যামের পুরো গতি পেতে বর্ধিত মেমরি প্রোফাইল, এক্সএমপি বা এ-এক্সএমপি সেটিং সক্ষম করতে পারেন, দ্রুততম 64৪০০ মেগাহার্টজ পর্যন্ত চলেছেন, যদিও এমন একটি মাদারবোর্ড প্রস্তুত করতে ভুলবেন না যা ওভারক্লকিং র্যামের জন্য সমর্থন করে যা সমর্থন করে. . .
আপনার যে পরিমাণ র্যাম রয়েছে এবং এর গতির মধ্যে আপনার প্রায় 16 গিগাবাইট পর্যন্ত সবচেয়ে বেশি প্রভাব ফেলেছে. গেমাররা দ্রুত র্যাম চাইবে, সুতরাং আপনার গেমের সুবিধাটি দেখার জন্য বেঞ্চমার্কের তুলনাগুলি পরীক্ষা করুন, কারণ সর্বোচ্চ গতির র্যাম দামি হতে পারে.
একটি গ্রাফিক্স কার্ড, বা জিপিইউ, একটি গ্রাফিকাল প্রসেসিং ইউনিট, একটি সম্প্রসারণ কার্ড যা আপনার মাদারবোর্ডে পিসিআই স্লটে ফিট করে. এটি জটিল গ্রাফিকাল নির্দেশাবলী, কম্পিউটিং ইমেজ, টেক্সচার এবং অবজেক্টগুলি পরিচালনা করে এবং ফলাফলটি এক বা একাধিক মনিটরে প্রেরণ করে. . এটি বেসিক ডেস্কটপ অ্যাপ্লিকেশনগুলি ঠিক সূক্ষ্মভাবে পরিচালনা করে তবে এটি সর্বোচ্চ এফপিএসে গেমের জন্য ডেডিকেটেড গ্রাফিক্স কার্ডের পারফরম্যান্সের কাছাকাছি কোথাও নেই এবং সর্বোচ্চে ক্র্যাঙ্ক করা বিশদ সহ.
দুটি শীর্ষস্থানীয় জিপিইউ নির্মাতারা হলেন এনভিডিয়া এবং এএমডি. . . . .


.. স্পিনিং ডিস্কগুলিতে ডেটা সঞ্চয় করতে চৌম্বকীয় প্রযুক্তি ব্যবহার করে এমন হার্ড ড্রাইভগুলি থেকে স্টোরেজটি বিকশিত হয়েছে. . তবে, এক সেকেন্ডে প্রায় 140 থেকে 180 মেগাবাইটের ডেটা স্থানান্তর সহ, গতি এসএসডি এবং এম দ্বারা ছাড়িয়ে গেছে.. .. .. . .
. . .2 স্টোরেজ লাঠি আমরা আজ দেখতে পাই. . .. ..
আপনার পিসি তৈরির সময় বিদ্যুৎ সরবরাহ বা পিএসইউ গুরুত্বপূর্ণ, কারণ এটি আপনার সিপিইউ, মাদারবোর্ড, গ্রাফিক্স কার্ড এবং সমস্ত পেরিফেরিয়ালগুলির জন্য এসিকে ডিসি পাওয়ারে রূপান্তর করে. . এনভিডিয়া জিপিইউগুলির জন্য, একটি সর্বশেষ জেনারেল আরটিএক্স 2000 সিরিজের জন্য প্রায় 650 থেকে 750 ওয়াট প্রয়োজন. নতুন আরটিএক্স 3080 জিপিইউতে 750 ওয়াট প্রয়োজন, এবং উচ্চ-শেষ আরটিএক্স 3090 এর জন্য 850 ওয়াট বা আরও বেশি প্রয়োজন. .
. এছাড়াও আপনার গ্রাফিক্স কার্ডগুলির জন্য দ্বৈত, এমনকি ট্রিপল 6+2 পিসিআই পাওয়ার সংযোজকগুলির প্রয়োজন হবে তবে বেশিরভাগ পিএসইউতে এটি রয়েছে.
. . . .
. সর্বাধিক দক্ষ (এবং সবচেয়ে ব্যয়বহুল) টাইটানিয়াম স্তর 90% এরও বেশি শক্তি দক্ষতা সরবরাহ করে.


ভাল তারের পরিচালনা সহ ভাল বায়ু প্রবাহ
তারের বিশৃঙ্খলার কারণে খারাপ বায়ু প্রবাহ
ভাল তারের পরিচালনা সহ ভাল বায়ু প্রবাহ
দুর্বল কেবল পরিচালনার ফলে উচ্চ তাপমাত্রা হবে
অনেক তারের কারণে অগোছালো চেহারা
আনপ্লাগ করতে কম তারের সাথে সহজ পিএসইউ প্রতিস্থাপন
সম্পূর্ণ কাস্টমাইজ করা যেতে পারে
সীমিত কাস্টমাইজেশন বিকল্প
. . প্রবেশের জন্য বাতাসে সামনের দিকে প্রশস্ত খোলার সন্ধান করুন এবং এগুলি ফিল্টার করা কেস থেকে ধুলা রাখতে সহায়তা করবে. দ্বিতীয়ত, আপনার কেসটি কী আকারের মাদারবোর্ড গ্রহণ করবে তা পরীক্ষা করে দেখুন, বেশিরভাগ মাদারবোর্ডগুলি এটিএক্স আকারের এবং ছোট ক্ষেত্রে ফিট করে না.
. তৃতীয়ত, আপনাকে কেস গ্রহণ করে জিপিইউর দৈর্ঘ্য পরীক্ষা করতে হবে, কারণ নতুন গ্রাফিক্স কার্ডগুলি 27, 30 বা প্রায় 33 সেন্টিমিটার দৈর্ঘ্যে পৌঁছতে পারে. ? আপনার স্টোরেজের জন্য কেসটি মাউন্টিং স্পট রয়েছে তা পরীক্ষা করুন.
? .
আপনি যদি তরল কুলিং করে থাকেন তবে রেডিয়েটারের ক্ষেত্রে মাউন্ট করার জন্য একটি স্পট দরকার, সুতরাং সামনের বা শীর্ষে 240 বা 360 মিলিমিটার রেড মাউন্টিং অবস্থানগুলি পরীক্ষা করুন. . . অবশেষে, কেস নির্মাণ. টেম্পারড গ্লাস প্যানেলগুলি ইন্টার্নালগুলি প্রদর্শন করে তবে যথেষ্ট ওজন যুক্ত করে এবং পরিবহণের সময় এবং ইনস্টলেশন পরেও যত্ন নেওয়া উচিত, সময়ের সাথে সাথে গ্লাসে ফাস্টেনারদের খুব শক্তভাবে টর্কে নয়, এটি ছিন্নভিন্ন হতে পারে. .
. .
.
ইঁদুরের মাউসের নীচে প্রতি ইঞ্চি বা ডিপিআই ট্র্যাক করার জন্য সেন্সর রয়েছে, ডিপিআই তত বেশি, মাউস তত বেশি সংবেদনশীল এবং কার্সারটি তত দ্রুত স্ক্রিনে যেতে পারে.
সাধারণ ইঁদুরগুলি প্রায় 1200 ডিপিআই, গেমিং ইঁদুরের 8000 বা তার বেশি ডিপিআই পর্যন্ত যাওয়ার বিকল্প রয়েছে, যদিও আপনার সেরা নির্ভুলতা পেতে ভাল নিয়ন্ত্রণ এবং একটি উচ্চ রেজোলিউশন ডিসপ্লে প্রয়োজন. .
একটি মনিটর একটি ডিসপ্লেপোর্ট বা এইচডিএমআই ™ কেবলের সাথে সংযোগ স্থাপন করে এবং উচ্চ-শেষের মডেলগুলিতে একটি ইউএসবি-সি ভিডিও ইনপুট থাকতে পারে. প্রায়শই সেখানে উত্তরাধিকার ভিজিএ থাকে, এটি ডি-সাব বা ডিভিআই ইনপুট নামেও পরিচিত. মনিটরগুলি সমতল বা বাঁকা হতে পারে এবং 1080p হ’ল প্রাথমিক রেজোলিউশন, তবে 1440p গেমার পছন্দ হয়ে উঠছে কারণ আপনি আরও গেমের বিশদ দেখতে পাচ্ছেন. উচ্চ রেজোলিউশন মিডিয়া প্লেব্যাক এবং সৃজনশীল পেশাদারদের জন্য 4 কে স্ক্রিন রয়েছে.
. আপনার প্রদর্শন দ্বিগুণ দ্রুত আপডেট করতে পারে এবং বিভক্ত-দ্বিতীয় পার্থক্য আপনাকে প্রতিযোগিতামূলক অনলাইন গেমগুলি জিততে সহায়তা করতে পারে. এএমডি ফ্রেইসিঙ্ক বা এনভিডিয়া জি-সিঙ্ক বৈশিষ্ট্যগুলি স্ক্রিন টিয়ারিং হ্রাস করতে পারে.
আপনার বিপরীতে এবং বিশেষত উজ্জ্বলতার দিকে মনোযোগ দেওয়া উচিত, যা ক্যান্ডালায় বা নিটগুলিতে রেট করা হয়, একই জিনিস. প্যানেল প্রকারটি আরও ভাল রঙের নির্ভুলতা এবং বৃহত্তর দেখার কোণগুলি, বা বাঁকানো নেমেটিক বা টিএন সহ ইন-প্লেন স্যুইচিং বা আইপি হতে পারে, এটি তার অতি-দ্রুত রিফ্রেশ হারের জন্য পরিচিত. .


গেমিং পিসি তৈরি করতে আমার কী জানা উচিত?
প্রতিটি গেমের ন্যূনতম সিস্টেমের প্রয়োজনীয়তার একটি সেট রয়েছে. উদাহরণস্বরূপ, এএএ গেমস গ্রাফিক্সের উপর অত্যন্ত গুরুত্ব দেয়, যখন এফপিএস গেমগুলি সেগুলিতে কম দাবি করতে পারে তবে ভাল সংযোগের মানের উপর জোর দেয়. . এটি আপনাকে আপনার পিসিতে খুব কম বা খুব বেশি ব্যয় এড়াতে সহায়তা করবে
দুটি শীর্ষস্থানীয় জিপিইউ নির্মাতারা হলেন এনভিডিয়া এবং এএমডি. এমএসআইতে, আমরা উভয় জিপিইউ ব্র্যান্ডের জন্য কার্ড সরবরাহ করি. এনভিডিয়ার জন্য, 3000-সিরিজ কার্ডগুলি 2000-সিরিজের উপর একটি বিশাল লাফ দেয়. বর্তমান 30 সিরিজের মডেলগুলি বেশিরভাগই আরটিএক্স 3090TI থেকে আরটিএক্স 3050 পর্যন্ত উত্সাহী কার্ড. এএমডি হিসাবে, আমাদের কাছে উত্সাহীদের জন্য 6000-সিরিজ কার্ড রয়েছে (আরএক্স 6950 এক্সটি থেকে আরএক্স 6700 এক্সটি) এবং পারফরম্যান্স স্তর (আরএক্স 6650 এক্সটি থেকে আরএক্স 6400).
আপনার কার্ডে ভিআরএএমের পরিমাণ বিবেচনা করতে হবে কারণ এটি আপনার জিপিইউর পারফরম্যান্সের জন্য গুরুত্বপূর্ণ. আপনার সম্পর্কে আরও একটি বিষয় ভাবা উচিত দক্ষ এবং কার্যকর শীতল করার জন্য দুর্দান্ত অনুরাগী থাকা. 1440p এ গেমিংয়ের জন্য প্রায় ডাবল (2x) প্রয়োজন, এবং 4 কে এর জন্য চতুর্ভুজ (4x) প্রয়োজন 1080p এ গেমগুলি চালানোর জন্য প্রয়োজনীয় শক্তি. দ্রুত 120 বা 144-হার্টজ রিফ্রেশ রেটগুলি স্ট্যান্ডার্ড 60 হার্টজের দ্বিগুণ, তাই তাদের ড্রাইভ করার জন্য আরও একটি দ্বিগুণ বা আরও বেশি গ্রাফিক্স শক্তি রয়েছে.
একটি এসএসডি দিয়ে গেমসের লোডিং সময় হ্রাস করুন
লোডিং সময়গুলি বিশ্বজুড়ে অনেক গেমারদের জন্য একটি সমস্যা. এটি প্রাথমিকভাবে আপনার নেটওয়ার্কের গতি এবং স্টোরেজ দ্বারা প্রভাবিত. অতএব, আপনার গেমিংয়ের অভিজ্ঞতা উন্নত করার আরেকটি উপায় হ’ল একটি এসএসডি (সলিড স্টেট ড্রাইভ) ড্রাইভ ব্যবহার করা যা উচ্চতর পঠন/ লেখার গতি সরবরাহ করে. .
ডান মাদারবোর্ড চয়ন করুন
একটি ভাল গেমিং মাদারবোর্ড কেবল ভবিষ্যতের আপগ্রেডের জন্য অনুমতি দেয় না, তবে এটি বর্ধিত গেমিং অভিজ্ঞতার জন্য স্বল্প-লেটেন্সি ভয়েস যোগাযোগও সরবরাহ করে. এমএসআই অফিসিয়াল সেরা সেরা ওয়েবসাইট আপনাকে গেমিংয়ের জন্য সেরা মাদারবোর্ড খুঁজে পেতে সহায়তা করতে পারে আপনার গেমিংয়ের প্রয়োজনীয়তার সাথে পুরোপুরি উপযুক্ত.

?
উচ্চ কার্যকারিতা ছাড়াও, প্রচুর পিসি ব্যবহারকারী তাদের নিজস্ব পিসিগুলি কাস্টমাইজ করার ক্ষেত্রে আরও বেশি মনোযোগ দিচ্ছেন, এর উপস্থিতি থেকে তার আনুষাঙ্গিকগুলিতে.আপনার খুব নিজস্ব ব্যক্তিগতকৃত রিগ চান? আপনার গেমিং কম্পিউটারকে সত্যই অনন্য করে তোলার জন্য কয়েকটি সাধারণ পদক্ষেপগুলি আপনার প্রয়োজন.
একটি পিসি কাস্টমাইজ করার উপায়
রঙ স্কিম দিয়ে শুরু করুন
- সাদা: এমপিজি জেড 690 ফোর্স ওয়াইফাই/ এমএসআই ম্যাগ বি 660 এম মর্টার ওয়াইফাই
- অল-ব্ল্যাক: মেগ জেড 690 ইউনিফাই
- নীল: ম্যাগ জেড 690 টর্পেডো
একটি প্রারম্ভিক পয়েন্ট হিসাবে, একই সিরিজ থেকে ম্যাচিং উপাদানগুলি পাওয়া আপনার রগ জুড়ে একটি ধারাবাহিক রঙ থিম বজায় রাখতে সহায়তা করে.
আরজিবি আলো যুক্ত করুন
আজকাল, অনেক কম্পিউটার আরজিবি আলো ডিভাইস দিয়ে সজ্জিত. . যথাযথ মিশ্রণ এবং ম্যাচিং হ’ল মনোরম আলোকসজ্জার প্রভাব পাওয়ার মূল চাবিকাঠি. এমএসআইয়ের মাইস্টিক লাইট সিঙ্ক আপনাকে বিভিন্ন রঙ এবং মোড সেটিংসের জন্য ধন্যবাদ ব্র্যান্ডের নতুন আলোক অভিজ্ঞতা সরবরাহ করে কেসের ভিতরে এবং বাইরে আরজিবি ডিভাইসগুলি সংযোগ এবং নিয়ন্ত্রণ করতে দেয়.
আরজিবি লাইটগুলি সাধারণত 12 ভি পাওয়ারে চালিত হয়, 5 ভি পাওয়ারে চালিত ডিজিটাল এলইডিগুলিও উপলব্ধ. . তাদের সিস্টেমে আরগিবি লাইটিংয়ের সাথে কাজ করার সময় ব্যবহারকারীদের আরও অনেক নমনীয় অভিজ্ঞতা থাকবে.

আরজিবি ডিভাইস কীভাবে ইনস্টল করবেন
- মাদারবোর্ডে আরজিবি শিরোনামে 4-পিন (3-পিন) আরজিবি সংযোগকারীটি প্লাগ করুন
- প্রয়োজনে কোনও আরজিবি অ্যাকসেসরিজ সংযোগ করার সময় পাওয়ার সংযোজকগুলিকে অতিরিক্তভাবে প্লাগ করুন
- F-অ-ফ্যান পণ্যগুলির জন্য, বিদ্যুৎ সরবরাহের 4-পিন সংযোগকারীদের সাথে সংযুক্ত করুন
কাস্টম ওয়াটার কুলিং সিস্টেম
. .
লাইভ স্ট্রিমিং ইন্টারনেট যুগে নতুন মিডিয়াগুলির একটি অপরিহার্য রূপে পরিণত হয়েছে, আপনাকে আপনার গেমিং দক্ষতা এবং অভিজ্ঞতাগুলি দূরবর্তীভাবে বন্ধুদের সাথে ভাগ করে নিতে সক্ষম করে. . আপনি শুরু করার আগে আপনার কিছু দরকারী পরামর্শ আপনার জানা উচিত.
?
প্রতিটি গেমের ন্যূনতম এবং প্রস্তাবিত হার্ডওয়্যার প্রয়োজনীয়তা রয়েছে, তবে যখন এটি একটি শালীন মানের দিকে স্ট্রিমিংয়ের কথা আসে তখন ন্যূনতম প্রয়োজনীয়তাগুলি যথেষ্ট ভাল হবে না. . আপনার সিপিইউ এবং জিপিইউ পারফরম্যান্স যখন এই নির্দিষ্ট কাজের চাপের কথা আসে তখন একটি গুরুত্বপূর্ণ ভূমিকা পালন করে.

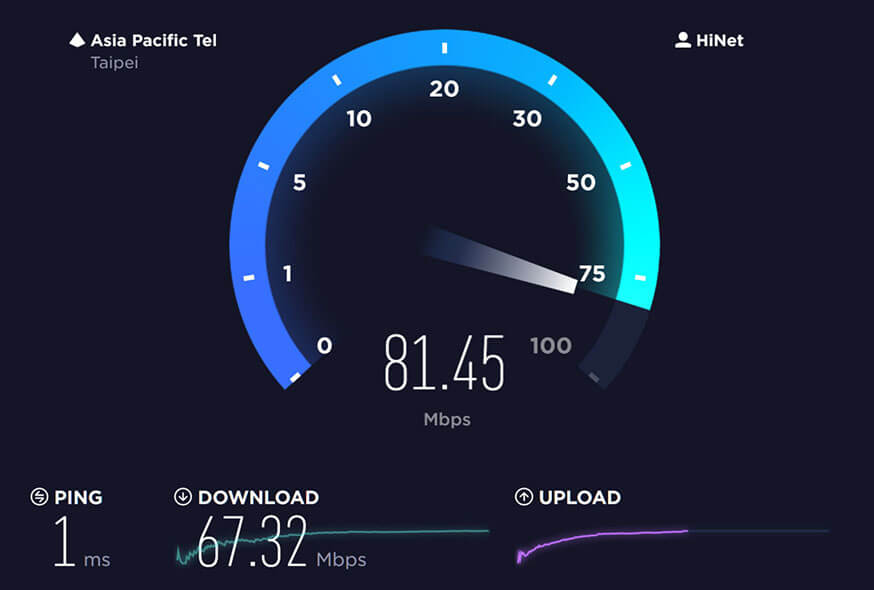
আপনার ইন্টারনেট কি যথেষ্ট দ্রুত??
বেশিরভাগ স্ট্রিমিংয়ের উদ্দেশ্যে একটি 20MB/s সংযোগ পর্যাপ্ত পরিমাণে বেশি. এমনকি যদি আপনার আপনার অঞ্চলে ধারাবাহিক সংকেত শক্তি এবং গতি থাকে তবে আপনার সেল ফোনের সাথে একটি ইন্টারনেট সংযোগ টিথার করে আপনি এমনকি একটি মসৃণ স্ট্রিমিং অভিজ্ঞতা পেতে পারেন.
সঠিক প্রসেসর চয়ন করুন
সিপিইউ উভয় লাইভস্ট্রিমিং এবং গেমিং পারফরম্যান্সকে প্রভাবিত করে, সুতরাং একটি একক পিসি স্ট্রিমিং সেটআপের সাহায্যে আপনার প্রসেসরটি টাস্ক পর্যন্ত রয়েছে তা নিশ্চিত করুন. . স্থিতিশীল উচ্চ মানের স্ট্রিমিংয়ের জন্য আমরা কমপক্ষে আর 7/আই 7 স্তরের প্রসেসরের প্রস্তাব দিই.
আমরা লাইভ স্ট্রিমিংয়ের জন্য কমপক্ষে 16 জিবি ডিডিআর 4 র্যামের প্রস্তাব দিই.
আপনি যে ধরণের স্ট্রিমিং সেটআপটি বেছে নিচ্ছেন তা নির্বিশেষে, আপনার এমন অ্যাপ্লিকেশনগুলির প্রয়োজন যা আপনার দর্শকদের কাছে আপনার সামগ্রীটি ক্যাপচার এবং লাইভস্ট্রিম করে. যদিও এটি করার অসংখ্য উপায় রয়েছে তবে স্ট্রিমারদের দ্বারা ব্যবহৃত সর্বাধিক জনপ্রিয়গুলি হ’ল:
পিসি বিল্ডিংয়ের সম্পূর্ণ গাইড
.