টিকটোকের 3 ডি ফটো প্রভাব কীভাবে করবেন পপসুগার টেক, একটি 3 ডি ফটো প্রভাব তৈরি করুন – কোরেল আবিষ্কার কেন্দ্র
একটি 3 ডি ফটো প্রভাব তৈরি করুন
তারপরে স্যুইচ করুন পটভূমি ইরেজার আপনার বিষয়গুলির কাছাকাছি থাকা অঞ্চলগুলির জন্য সরঞ্জাম. দ্য পটভূমি ইরেজার আপনি যেখানে ক্লিক করেন সেখানে একই রঙের পিক্সেলগুলি মুছুন. আপনার সামঞ্জস্য করতে হবে সহনশীলতা সেটিং সরঞ্জাম বিকল্প প্যালেট, আপনার ব্যাকগ্রাউন্ডের রঙ (গুলি) আপনার বস্তুর রঙের সাথে কতটা ঘনিষ্ঠভাবে মেলে তার উপর নির্ভর করে. ব্যাকগ্রাউন্ড স্তরটির জন্য আমরা যে উজ্জ্বল হলুদ রঙটি বেছে নিয়েছি তা কোন পিক্সেল অপসারণ করা দরকার তা দেখতে সহজ করে তোলে.
এইভাবে আপনি 3 ডি ফটো এফেক্টটি করেন যা টিকটোককে গ্রহণ করছে
আপনি যদি আইফোনের ফটো-এডিটিং হ্যাক বা এই ভাইরাল পেস্টো ডিমের মতো টিকটোক ট্রেন্ডগুলির সাথে আপ টু ডেট হন তবে সম্ভাবনাগুলি আপনি এর নতুন ক্রেজটি দেখেছেন: একটি 3 ডি ফটো এফেক্ট. প্রভাব-যা বাইরের অ্যাপ্লিকেশনটিতে করা হয়-ছবিগুলিকে ত্রি-মাত্রিক ল্যান্ডস্কেপে রূপান্তরিত করে, তাদেরকে প্রাণবন্ত করে তোলে এবং তাদের চেহারা দেখায়, ভাল, সত্যই ফ্রেইকিন ‘শীতল. টিকটোক ব্যবহারকারীরা তাদের 3 ডি ছবিগুলি প্লেফোনকের “ফোনকি টাউন” গানে ডাব করছেন এবং হ্যাশট্যাগ #3DPHOTOEFFECT যুক্ত করছেন (যা এখনও পর্যন্ত সাত মিলিয়নেরও বেশি ভিউ রয়েছে). সত্যিই, আমরা সুতরাং এটির জন্য এখানে. আপনি যদি আপনার ছবিগুলিকে অতিরিক্ত কিছু প্রান্ত দেওয়ার জন্য এই প্রবণতায় উঠতে চান তবে এই নির্দেশাবলী অনুসরণ করুন:
টিকটোক 3 ডি ফটো প্রভাব কীভাবে করবেন
- অ্যাপ ক্যাপকুট ডাউনলোড করুন
- অ্যাপটি খুলুন এবং একটি ফটো আমদানি করুন
- “সম্পাদনা” আলতো চাপুন
- “স্টাইল” আলতো চাপুন
- “3 ডি জুম” এ আলতো চাপুন
- ক্যামেরা রোলে সংরক্ষণ কর
আপনি যদি চান তবে আপনি একবারে একাধিক ফটো আপলোড করতে পারেন. আপনি যদি এটি “ফোনকি টাউন” এ ডাব করতে চান তবে 11 টি ফটো করার পরামর্শ দেওয়া হচ্ছে তবে আপনি যে কোনও গান বা আপনার পছন্দসই ফটোগুলির সাথে খেলতে পারেন.
3 ডি ফটো প্রভাবের আগে

চিত্র উত্স: হ্যালি লিন্ডেস
3 ডি ফটো প্রভাব পরে
চিত্র উত্স: হ্যালি লিন্ডেস
একটি 3 ডি ফটো প্রভাব তৈরি করুন
এই টিউটোরিয়ালে আমরা আপনাকে দেখাব যে কীভাবে একটি সাধারণ ফটোকে 3 ডি ফটোতে রূপান্তর করতে হবে, এমন একটি প্রভাব ব্যবহার করে যা “সীমানার বাইরে” প্রভাব হিসাবেও পরিচিত. এই ফটো এডিটিং কৌশলটি এটিকে এমনভাবে প্রদর্শিত হবে যেন আপনার ছবির অংশটি ফ্রেমের ঠিক বাইরে আসছে. যদিও ফলাফলগুলি বেশ চিত্তাকর্ষক, এই কৌশলটি আসলে বেশ সহজ.

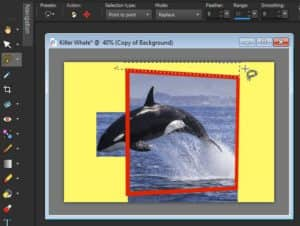
পদক্ষেপ 1: আপনার 3 ডি ছবির জন্য একটি পটভূমি যুক্ত করুন
মধ্যে স্তরগুলি প্যালেট, আপনার ফটোতে ডান ক্লিক করুন (পটভূমি স্তর) এবং নির্বাচন করুন নকল. এইভাবে, আপনার আসল ছবি অক্ষত থাকবে.
নীচে স্তরগুলি প্যালেট, ক্লিক করুন নতুন আবরন আইকন এবং নির্বাচন করুন নতুন রাস্টার স্তর. এটি 3 ডি ছবির পটভূমি হবে.
সক্রিয় বন্যা পূরণ সরঞ্জাম এবং একটি উজ্জ্বল, বিপরীত রঙ নির্বাচন করুন উপকরণ প্যালেট, যেমন হলুদ. মধ্যে সরঞ্জাম বিকল্প প্যালেট, নিশ্চিত করুন সমস্ত স্তর ব্যবহার করুন চেক করা হয় না, তারপরে চিত্রটিতে ক্লিক করুন বন্যা পূরণ নতুন স্তরটি হলুদ দিয়ে পূরণ করার সরঞ্জাম.
মধ্যে স্তরগুলি প্যালেট, অনুলিপি করা ফটো স্তরের নীচে শক্ত রঙের স্তরটি টেনে আনুন. তারপরে এটি সক্রিয় স্তরটি তৈরি করতে অনুলিপি করা ফটো স্তরটিতে ক্লিক করুন যাতে নতুন অবজেক্টগুলি এই স্তরটির উপরে স্থাপন করা হয়.
পদক্ষেপ 2: একটি ফ্রেম যুক্ত করুন
ফ্রেম তৈরি করতে, সক্রিয় করুন আয়তক্ষেত্র টুল. মধ্যে উপকরণ প্যালেট সেট অগ্রভাগ (শীর্ষ) আপনি ফ্রেমটি হতে চান এমন রঙে স্যুইচ করুন (এই ক্ষেত্রে আমরা লাল ব্যবহার করছি), এবং সেট করুন পটভূমি (নীচে) সোয়াচের নীচে ছোট চেকারবোর্ড আইকনে ক্লিক করে স্বচ্ছ হয়ে যায়.
মধ্যে সরঞ্জাম বিকল্প প্যালেট, সামঞ্জস্য করুন প্রস্থ সেট করা যাতে এটি যথেষ্ট ঘন হয়. আপনার ছবির আকারের উপযুক্ত প্রস্থ পেতে আপনাকে এই সেটিংটি কয়েকবার সামঞ্জস্য করতে হতে পারে.
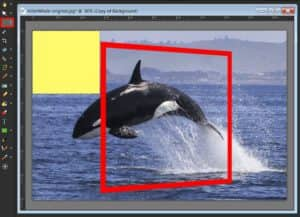
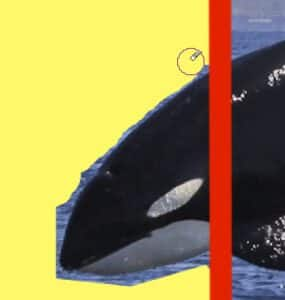
সঙ্গে আয়তক্ষেত্র টুল, আয়তক্ষেত্রটি আঁকতে আপনার ফটোতে ক্লিক করুন এবং টানুন যাতে ছবির অংশটি ফ্রেমের বাইরে থাকে, এক্ষেত্রে তিমির মাথা.
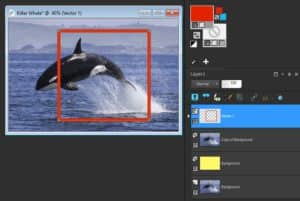
যেহেতু একটি আয়তক্ষেত্রটি একটি ভেক্টর অবজেক্ট, এটি তার নিজস্ব ভেক্টর স্তরে তৈরি করা হয়েছে. তবে এই ফ্রেমে যে পরিবর্তনগুলি করা দরকার তার জন্য, আয়তক্ষেত্রটি অবশ্যই একটি রাস্টার অবজেক্ট হতে হবে. এটি করা সহজ: এর স্তরটিতে ডান ক্লিক করুন স্তরগুলি প্যালেট এবং নির্বাচন করুন রাস্টার স্তরে রূপান্তর করুন.
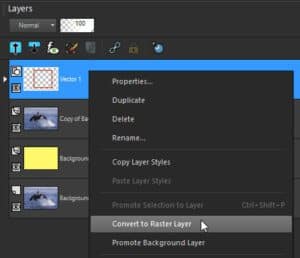
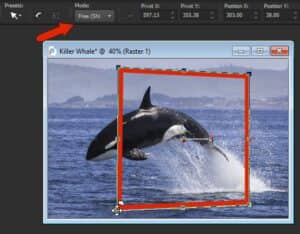
ফ্রেমটিকে 3 ডি চেহারা দিতে, সক্রিয় করুন বাছাই সরঞ্জাম এবং সেট মোড প্রতি বিনামূল্যে মধ্যে সরঞ্জাম বিকল্প প্যালেট. এখন ব্যবহার করুন বাছাই বাম দিকে এবং নীচে দুটি নোড সরানোর সরঞ্জাম.
পদক্ষেপ 3: ফ্রেমের বাইরে পটভূমি সরান
এখন আমাদের ফ্রেমের বাইরে ছবির অংশগুলি সরিয়ে ফেলতে হবে. মধ্যে স্তরগুলি প্যালেট, এটি সক্রিয় স্তর তৈরি করতে অনুলিপি করা ফটো স্তরটিতে ক্লিক করুন.
সক্রিয় নির্বাচন সরঞ্জাম এবং মধ্যে সরঞ্জাম বিকল্প প্যালেট সেট নির্বাচনের ধরণ প্রতি আয়তক্ষেত্র এবং মোড প্রতি প্রতিস্থাপন. একটি নির্বাচনের ক্ষেত্র তৈরি করতে আপনার ফটোতে ক্লিক করুন এবং টানুন তারপরে টিপুন মুছে ফেলা অপসারণ কী. টিপুন Ctrl + ডি আপনি সবেমাত্র মুছে ফেলেছেন এমন অঞ্চলটি নির্বাচন করতে.
ফ্রেমের বাইরের অন্যান্য অঞ্চলগুলি অপসারণ করতে আবার এই পদক্ষেপগুলি অনুসরণ করুন.
টিপ: যেখানে ফ্রেমের উপরে এবং নীচে ট্র্যাপিজয়েড আকারগুলির মতো অ-রিক্যাঙ্গুলার অঞ্চল রয়েছে, সেখানে স্যুইচ করুন ফ্রিহ্যান্ড নির্বাচন সরঞ্জাম এবং সেট নির্বাচনের ধরণ প্রতি বিন্দু বিন্দু. প্রারম্ভিক পয়েন্টে একবার ক্লিক করুন তারপরে আকারের পরবর্তী 2 কোণে ক্লিক করুন. নির্বাচনের ক্ষেত্রটি সম্পূর্ণ করতে চতুর্থ কোণে ডাবল ক্লিক করুন তারপরে টিপুন মুছে ফেলা মুছতে কী.
যে কোনও অবশিষ্ট অংশগুলি অপসারণ করা দরকার, আপনি এটি ব্যবহার করতে পারেন ইরেজার সরঞ্জাম এবং পটভূমি ইরেজার টুল. মধ্যে সরঞ্জাম বিকল্প প্যালেট, সেট করুন কঠোরতা প্রতি 100 এবং সামঞ্জস্য আকার যদি প্রয়োজন হয় (আপনি এটি ধরে রেখে ব্রাশের আকারও সামঞ্জস্য করতে পারেন Alt কী এবং আপনার ফটোতে উপরে বা নীচে টেনে আনছে ইরেজার টুল).
ব্যবহার ইরেজার আপনার বিষয়ের কাছাকাছি নয় এমন অঞ্চলগুলির জন্য সরঞ্জাম, এক্ষেত্রে তিমির মাথা.
তারপরে স্যুইচ করুন পটভূমি ইরেজার আপনার বিষয়গুলির কাছাকাছি থাকা অঞ্চলগুলির জন্য সরঞ্জাম. দ্য পটভূমি ইরেজার আপনি যেখানে ক্লিক করেন সেখানে একই রঙের পিক্সেলগুলি মুছুন. আপনার সামঞ্জস্য করতে হবে সহনশীলতা সেটিং সরঞ্জাম বিকল্প প্যালেট, আপনার ব্যাকগ্রাউন্ডের রঙ (গুলি) আপনার বস্তুর রঙের সাথে কতটা ঘনিষ্ঠভাবে মেলে তার উপর নির্ভর করে. ব্যাকগ্রাউন্ড স্তরটির জন্য আমরা যে উজ্জ্বল হলুদ রঙটি বেছে নিয়েছি তা কোন পিক্সেল অপসারণ করা দরকার তা দেখতে সহজ করে তোলে.

পদক্ষেপ 4: আপনার বিষয়/বস্তুর পিছনে ফ্রেমটি সরান
ফ্রেমের বাইরের দিক থেকে পটভূমিটি সরানো হয়ে গেলে, পরবর্তী পদক্ষেপটি আপনার 3 ডি বিষয়/অবজেক্টের পিছনে থাকা ফ্রেমের অংশটি মুছতে হয় (i.ই. তিমির মাথা).
মধ্যে স্তরগুলি প্যালেট, এটি সক্রিয় স্তর তৈরি করতে ফ্রেম স্তরটিতে ক্লিক করুন. সমন্বয় করা অস্বচ্ছতা এই স্তরটির অস্বচ্ছতা হ্রাস করতে স্লাইডার, আপনাকে কোথায় মুছে ফেলতে হবে তা আরও সহজ করে তুলতে.
এখন ব্যবহার করুন ইরেজার তিমির পিছনে থাকা ফ্রেমের অংশগুলি সরিয়ে ফেলার সরঞ্জাম. আপনার কাজ শেষ হয়ে গেলে, স্তরটি অস্বচ্ছতাটি 100 টি পর্যন্ত ফিরিয়ে আনুন.
পদক্ষেপ 6: একটি নতুন পটভূমি যুক্ত করুন (al চ্ছিক)
মূলত আমরা তৈরি করা উজ্জ্বল হলুদ ব্যাকগ্রাউন্ডটি মুছে ফেলার সময় খুব সহায়ক ছিল তবে আমাদের চূড়ান্ত 3 ডি ছবির জন্য আমরা যে চেহারাটি চাই তা নয় তাই আমরা পরিবর্তে এটি একটি প্যাটার্ন দিয়ে প্রতিস্থাপন করব.
মধ্যে স্তরগুলি প্যালেট, এটি সক্রিয় স্তর তৈরি করতে হলুদ ব্যাকগ্রাউন্ড স্তরটিতে ক্লিক করুন. মধ্যে উপকরণ প্যালেট, ক্লিক করুন অগ্রভাগ (শীর্ষ) খোলার জন্য সোয়াচ বস্তুর বৈশিষ্ট্য জানলা. নির্বাচন করুন প্যাটার্ন ট্যাব এবং তারপরে আপনি যে প্যাটার্নটি ব্যবহার করতে চান তা চয়ন করুন (আমরা এটি ব্যবহার করেছি ক্র্যাক পেইন্ট প্যাটার্ন). সক্রিয় বন্যা পূরণ প্যাটার্নটি পূরণ করতে আপনার চিত্রটিতে সরঞ্জাম এবং ক্লিক করুন.

দুটি ফটো সহ 3 ডি ফটো প্রভাব
এই কৌশলটি দুটি চিত্রের সেট সহ ব্যবহার করা যেতে পারে. এই উদাহরণ হিসাবে, আমরা একটি প্রাচীরের উপর ঝুলন্ত একটি ফ্রেমের একটি ফটো এবং টিকটিকিটির একটি ফটো ব্যবহার করছি. টিকটিকি ফ্রেম থেকে বেরিয়ে আসার মতো দেখতে আমরা 3 ডি ফটো কৌশলটি ব্যবহার করব.
প্রাচীরের ফ্রেমের আমাদের ফটোতে, ফ্রেমটি সাদা দিয়ে পূর্ণ এবং আমাদের এটি সরিয়ে এবং টিকটিকি দিয়ে প্রতিস্থাপন করতে হবে. ছবির ফ্রেমের অভ্যন্তরে পিক্সেলগুলি সরিয়ে ফেলতে আমাদের প্রথমে প্রচার করতে হবে পটভূমি স্তর যাতে এটি একটি রাস্টার স্তর হয়ে যায়. মধ্যে স্তরগুলি প্যালেট, ডান ক্লিক করুন পটভূমি স্তর এবং নির্বাচন করুন পটভূমি স্তর প্রচার.
কারণ অপসারণের অঞ্চলটি একটি শক্ত রঙের আয়তক্ষেত্রাকার অঞ্চল যা আমরা ব্যবহার করতে পারি নির্বাচন সরঞ্জাম সহজেই. সক্রিয় নির্বাচন হোয়াইট ব্যাকগ্রাউন্ডের চারপাশে একটি নির্বাচনের ক্ষেত্র তৈরি করতে সরঞ্জাম এবং ক্লিক করুন এবং টানুন, তারপরে টিপুন মুছে ফেলা.
এখন আমাদের ফটোতে টিকটিকি চিত্র যুক্ত করা দরকার. আপনি অনুলিপি করে এটি করতে পারেন (Ctrl + গ) টিকটিকি ফটো এবং এটি আটকানো (Ctrl + V) ফটো ফ্রেমের চিত্রটিতে, বা সরাসরি এটি টেনে নিয়ে স্তরগুলি প্যালেট. টিকটিকি চিত্রটি যুক্ত হয়ে গেলে, এটি ফটো ফ্রেম স্তরটির নীচে টেনে আনতে ভুলবেন না স্তরগুলি প্যালেট তারপরে স্তর অস্বচ্ছতা হ্রাস করুন.
টিকটিকি স্তরটি সক্রিয় করুন এবং ব্যবহার করুন বাছাই সরঞ্জাম, ভিতরে স্কেল মোড, আকার পরিবর্তন এবং এটি জায়গায় স্থানান্তরিত করতে.
ফ্রেম স্তরটিতে ফিরে গিয়ে ব্যবহার করুন ইরেজার টিকটিকি মাথার পিছনে থাকা ফ্রেমের অংশটি সাবধানতার সাথে মুছে ফেলার জন্য একটি ছোট ব্রাশের আকারের সরঞ্জাম, পাশাপাশি টিকটিকিটির মাথা ব্লক করা সমস্ত পিক্সেল.
আপনার কাজ শেষ হয়ে গেলে, স্তরটি অস্বচ্ছতাটি 100 টি পর্যন্ত ফিরিয়ে আনুন. এবং আমাদের এখন একটি নতুন যাদুঘর মাস্টারপিস রয়েছে!